Author Archives: John Salatas

HandsFree Wear: A wrist gesture input method for Android based smartwatches

1. Introduction

In this article we will present an Application for interacting with an android wear smartwatch through wrist gestures. As smartwatches are typically worn in the wrist, one would expect a hands-free way of interaction, leaving the other hand free for other activities. Android wear also offers a voice activated interaction, however this wouldn’t be a solution in several social situations (i.e. during a business conference) or in situations in which users require their own privacy.

Such application could greatly improve the accessibility of smartwatches for one-handed users, who may be either amputees or users who are unable to use both hands, as in the case of cerebral palsy which usually is combined with a speech impairment as well, turning the smartwatch to a completely useless device.

The author of this article falls in this last case of users, so this article is motivated by the author’s self interest and is being publicized in hope that it will benefit other people as well.

1.1. Literature review

Literature in the field of hands-free interaction with a wrist wearable device, offer many examples, such as the Gesturewrist system which allow users to interact with wearable or nearby computers by using gesture-based commands [1]. Guo and Paek explored two tilt-based interaction techniques for menu selection and navigation: AnglePoint, which directly maps the position of a virtual pointer to the tilt angle of the smartwatch, and ObjectPoint, which objectifies the underlying virtual pointer as an object imbued with a physics model [2]. Xu et al. showed that motion energy measured at the smartwatch is sufficient to uniquely identify user’s hand and finger gestures [3]. Gong et al. proposed and studied a new input modality, WristWhirl, that uses the wrist as an always-available joystick to perform one-handed continuous input on smartwatches [4]. In Chen et al.’s Swipeboard, characters are entered with two swipes; the first swipe specifies the region where the character is located, and the second swipe specifies the character within that region [5]. Furthermore, they also created ZoomBoard which uses iterative zooming to enlarge otherwise impossibly tiny keys to comfortable size [6]. Finally, Wen et al. in Serendipity demonstrated the potential to distinguish 5 fine-motor gestures like pinching, tapping and rubbing fingers using integrated motion sensors (accelerometer and gyroscope) in off-the-shelf smartwatches [7].

2. The HandsFree Wear application

HandsFree Wear is an Accessibility Service [8] for Android Wear Smartwatches [9] which gives you the ability to use discrete wrist gestures to select controls and interact with them without the need of a second hand or voice input. Android wear already provides a set of three distinct wrist gestures [10] that can be performed in a smartwatch. HandsFree Wear on the other hand can recognize 14 distinct wrist gestures and map these into touch gestures or AccessibilityActions [11] as follows:

  1. Scroll Left: It is performed by moving your hand left and then back (Figure 1.a). It performs ACTION_SCROLL_LEFT or ACTION_DISMISS to the first visible element that supports either of these actions. If no such element exist it performs a horizontal swipe starting at 75% of screen’s width and ending at 25% of screen’s width.
  2. Scroll Right: It is performed by moving your hand right and then back (Figure 1.b). It performs ACTION_SCROLL_RIGHT or ACTION_DISMISS to the first visible element that supports either of these actions. If no such element exist it performs a horizontal swipe starting at 25% of screen’s width and ending at 75% of screen’s width.
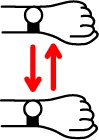
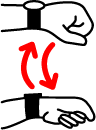
  3. Scroll Up: It is performed by moving your hand towards your body and then back (Figure 1.c). It performs ACTION_SCROLL_UP or ACTION_SCROLL_BACKWARD to the first visible element that supports either of these actions. If no such element exist it performs a vertical swipe starting at 25% of screen’s height and ending at 75% of screen’s height.
  4. Scroll Down: It is performed by moving your hand away from your body and then back (Figure 1.d). It performs ACTION_SCROLL_DOWN or ACTION_SCROLL_FORWARD to the first visible element that supports either of these actions. If no such element exist it performs a vertical swipe starting at 75% of screen’s height and ending at 25% of screen’s height.
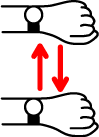
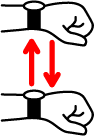
  5. Click: It is performed by moving your hand down and then back (Figure 1.e). It performs ACTION_CLICK, ACTION_COLLAPSE or ACTION_EXPAND to the selected element.
  6. Go Back: It is performed by moving your hand up and then back (Figure 1.f). It performs the Global Action Back (GLOBAL_ACTION_BACK).
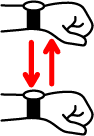
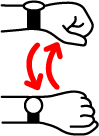
  7. Select Next: It is performed by flicking your wrist towards you and then back (Figure 1.g). It selects the next element (breadth first search) that supports any of the AccessibilityActions described here.
  8. Select Previous: It is performed by flicking your wrist towards you and then back (Figure 1.h). It selects the previous element (breadth first search) that supports any of the AccessibilityActions described here.
  9. Swipe Left: Two times in a row the Scroll Left gesture (1). It performs a horizontal swipe from right to left in the whole screen’s width.
  10. Swipe Right: Two times in a row the Scroll Right gesture (2). It performs a horizontal swipe from left to right in the whole screen’s width.
  11. Swipe Down: Two times in a row the Scroll Up gesture (3). It performs a vertical swipe from top to bottom in the whole screen’s height, essentially the same as scrolling a list up.
  12. Swipe Up: Two times in a row the Scroll Down gesture (4). It performs a vertical swipe from bottom to top in the whole screen’s height, essentially the same as scrolling a list down.
  13. Long Click: Two times in a row the Click gesture (5). It performs ACTION_LONG_CLICK, to the selected element.
  14. Google Assistant: Two times in a row the Go Back gesture (6). It performs the Global Action Power Dialog (GLOBAL_ACTION_POWER_DIALOG), which shows the Google Assistant.

(c)

(d)

(e)

(f)

(g)

(h)

(a)

(b)

Figure 1: Wrist gestures

2.1. Data

Our initial intuition suggested that data from the smartwatch’s accelerometer and/or gyroscope would be proved to provide sufficient data and after some preliminary tests, we concluded that Android’s linear acceleration sensor [12] was enough as we will show in the next sections.

In order to record data we created the required smartwatch and desktop application. Both applications are available in the project’s github repository [13]. The SensorData Accessibility Service runs in the smartwatch and constantly sent linear accelerometer’s data to an HTTP server which is provided by the DataProcess project [13].

Class gr.ictpro.jsalatas.gestures.ui.recorddata.RecordDataUI in that projects, starts an embedded HTTP Server which receives incoming data from the smartwatch, stores these in a SQLite Database and also visualizes it in the screen as a form of visible feedback to the user (Figure 2).

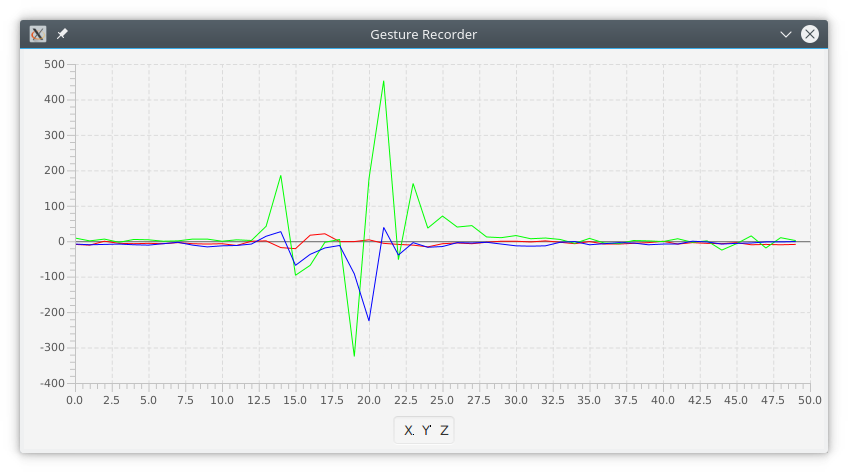
Figure 2: The Gesture Recorder UI

A total of 156.730 linear accelerometer’s readings where saved as the author of this article performed each of the gesture above several times, giving enough space between each gesture in order to be able to distinguish it.

2.2. Preprocess

Having the raw data, our first task was to go through the data and manually tag the segments that a gesture was performed. The DataProcess project [13] contains the class gr.ictpro.jsalatas.
gestures.ui.classify.ClassifyUI
which brings up a GUI with tools necessary to pan, zoom in the chart and and tag segments of data with a particular gesture (Figure 3).

Figure 3: The Classification UI, showing the tagging of a series of Select Next gestures

The window size (w_t ) we used for the tagging of each gesture was 20. That is, each gesture contained of 20 discrete (x, y, z) vector values:

\lbrace (x, y, z) _i , i=0,1,\dots,w_t-1 \rbrace

Class gr.ictpro.jsalatas.gestures.export.Csv contains the necessary code to export a series of a tagged vectors (x, y, z, t) _i to a CSV file that could then be used as input data for the training of the model. A rolling window (w_c ) of width 30 was used in order to provide us an instance containing 30 (x, y, z) _i vectors plus one gesture class (c ) that characterized the whole vector.

\lbrace ((x, y, z) _{i+j},c)_i , i=0,1,\dots,w_t-1-w_c , j=0,1,\dots,w_c-1 \rbrace

Where

c_i=\left\{ \begin{array}{ll} t_l & \exists l \in\{i,i+1,\dots,i+w_c: t_i=0,t_{i+w_c-1}=0,t_l \neq 0 \}\\ 0 & \text{elsewhere} \end{array} \right.

2.3. Model training and optimization

Having these instances, we switch to the python project named train [13][13.a], which is based on tensorflow [14] and keras [15], in order to build a Sequential model that recognizes such gestures. In general, the project contains all the necessary code in order to load the previously generated CSV file, split it into training and validation set and run a genetic algorithm with the objective of finding the optimal neural network parameters (in particular number of layer/neurons, activation functions, training algorithm and number of epochs). We also keep track of the recognition’s accuracy (percent). As an additional note, the input dataset is highly imbalanced with a dominant “no gesture” (0) output and needs to be weighted which is accounted by the relevant class weights.

We executed the genetic algorithm for 20 generations, having a population of 25 individual networks, and for the parameters shown in Table 1:

Table 1: Genetic Algorithm’s parameters

Epochs: 3000
Number of Layers: 1
Maximum Number of Neurons per Layer: 3000
Activation: [‘relu’, ‘elu’, ‘tanh’, ‘sigmoid’]
Optimizer: [‘rmsprop’, ‘adam’, ‘sgd’, ‘adagrad’, ‘adadelta’, ‘adamax’, ‘nadam’]

The best network after 20 generations had the parameters and performance as shown in the following Tables:

Table 2: Best Model

Epochs: 632
Number of Layers: 1
Number of Neurons: 2558
Activation: ‘sigmoid’
Optimizer: ‘adadelta’

Table 3: Best Model’s Performance (Validation set)

Accuracy: 96.37%
Loss: 0.1214

Table 4: Best Model’s Confusion matrix (Training and Validation sets)

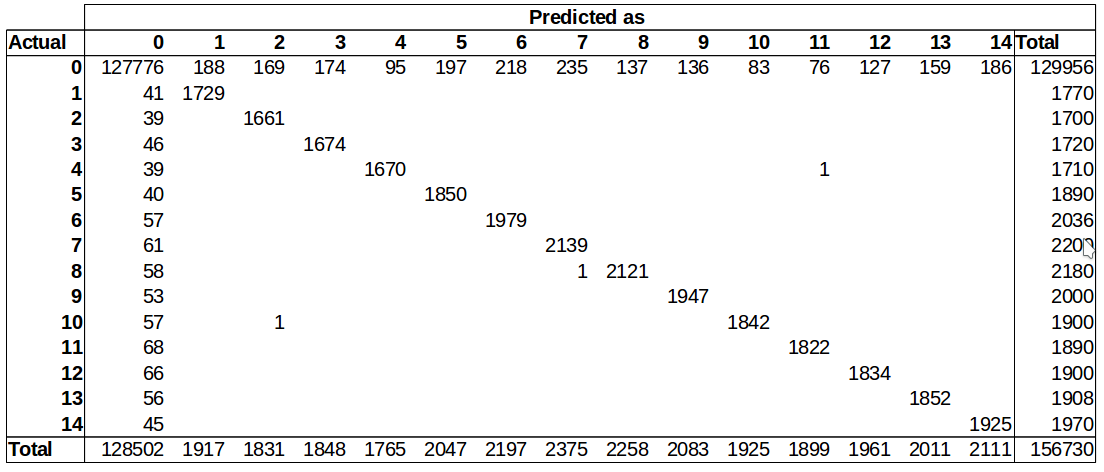
Having the model we converted it to a tensorflow graph and freeze it to a protobuf file then can be used in java code for the actual recognition.

2.4. Results

In project DataProject [13], class gr.ictpro.jsalatas.gestures.ui.predictions.
PredictionsUI contains the necessary code to use that protobuf model and visualize the predictions along with the actual class side by side with the (x, y, z) vectors as show in Figure 4, where in the lower chart blue is the actual class and red the predicted.

Figure 4: The Predictions UI.

As expected, a gesture is recognized after completed and it can can be recognized in a windows equal to 10 (w_c-w_t ). As seen in the Confusion Matrix (Table 4), there are many input (x,y,z) vectors marked as ‘no gesture’ (0) which are recognized as a particular gesture and, on the opposite, there are many of as well which are not recognized. Figure 4 above provides several examples for such cases, which seem to be the majority through the whole dataset. There are however some cases of false positives such as the ones depicted in Figure 5.

Figure 5: The Predictions UI, showing cases of false positives.

These type of false positives are easy to handle by taking into account the whole series of 10 (w_c-w_t ) predictions (State) and expecting to have a minimum number of appearances (Recognition Accuracy) for a particular non-zero class.

2.5. Accessibility service in android

As mentioned, the HandsFree Wear application consists of an Accessibility service which recognizes the wrist gestures performed by the users and taking the relevant actions as depicted in Figure 6.

Figure 6: HandsFree Wear’s Activity Diagram

The HandsFree Wear application is available as beta version in Google’s play store [16].

2.5.1. Preliminary Evaluation

The application is currently used and evaluated by the author of this article in a daily basis, during the last 2-3 weeks in a Ticwatch E (Android 7.1.1 and Android Wear 2.8.0). The device’s hardware is more than efficient and it consumes about 1% of the battery’s capacity per hour (based on the author’s usage).

In general, with the exception of the issues described in the next section, the device was 100% accessible: Through the wrist gestures described previously, users can go through their notifications and dismiss them or open and interact with them, like reply to an email or instant message with an emoticon or a predefined phrase, start any application from the smartwatch’s launcher and interact with it, go through the device’s settings and modify these, etc.

2.5.2. Issues

At the moment maybe the most important issue is Google’s Input Methods for wearable devices (Figure 7), which is still an open research field as we saw in the Swipeboard [5] and Zoomboard [6] systems.

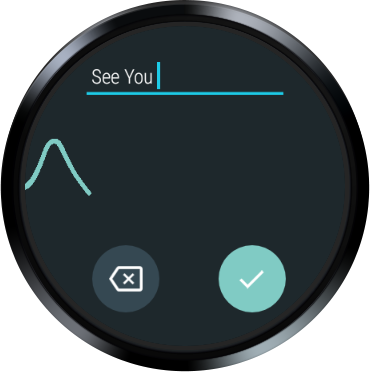
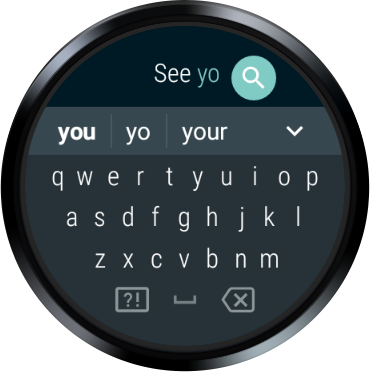
Figure 7: Google’s Input Methods (Android 7.1.1)

Another issue lies in the methodology we used to collect data. The trained model is unable to recognize any gesture while the user is walking. It can however recognize gestures (although at a lower, unknown accuracy) if the user is inside a car moving with a relative steady speed.

Moving to specific applications, it seems that the watch-face’s compilations (Figure 8), don’t seem to advertise the actions the support and most importantly ACTION_CLICK, and thus turning them non selectable through Select Next / Select Previous wrist gestures.

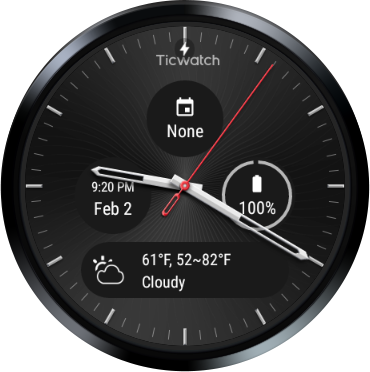
Figure 8: Watch-face with four compilations

Finally, the Google Maps application seem to have two issues. The buttons overlay in map canvas seem to hide after some time of inactivity, giving full visibility to the map (Figure 9) and eventually making them inaccessible in to HandsFree Wear service. Also the items in “Around Here” list (Figure 10) don’t seem to advertise the ACTION_CLICK method, and thus turning them non selectable through Select Next / Select Previous wrist gestures.

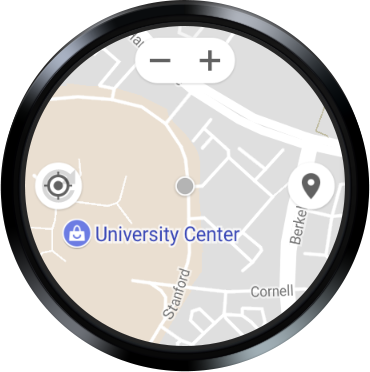
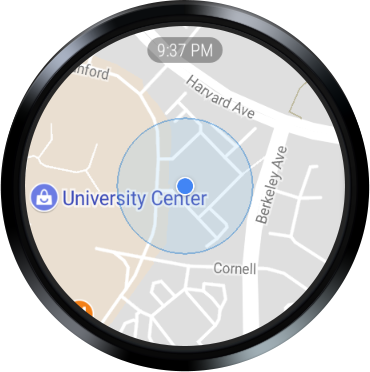
Figure 9: Google Maps with visible and hidden button overlay

Figure 10: Google Maps “Around Here” list

3. Future work – Conclusion

As a general conclusion of our study, it seem that the created HandsFree Wear application is usable for most common task on a daily basis, at least from the author’s perspective. It would be interesting to have feedback from other users as well and this is the primary reason that we are making it available either as a ready to use application through Google Play Store [16] or in the form of its source code [13]. It would be also interested evaluate the model’s performance in recognizing wrist gestures that are performed from other people. Our first impression here is that the model wouldn’t perform that well, but users should be able to learn how to perform the gestures in a way recognized by the model.

Regarding the input methods issue, we are planning to further investigate it, and preferably create an accessible (in the HandsFree Wear application’s context) input method with an initial idea to create and evaluate a phonepad like UI with T9 capabilities.

Finally, regarding the issues in Google Maps application, after further investigating it, we plan to compile a bug report and communicate with google.

As a final remark, it is the author’s impression that in the IoT era we may need to redefine what accessibility means, giving the fact that apparently most the current research is focused towards voice-user interfaces, which are not suitable for all users. We believe that we need to make sure that either speech recognition works for all users and in a language that they understand, or offer alternative input methods, that may even not require voice or limp use at all like [17].

References

[1] Rekimoto, J., 2001. Gesturewrist and gesturepad: Unobtrusive wearable interaction devices. In Wearable Computers, 2001. Proceedings. Fifth International Symposium on (pp. 21-27). IEEE.

[2] Guo, A. and Paek, T., 2016, September. Exploring tilt for no-touch, wrist-only interactions on smartwatches. In Proceedings of the 18th International Conference on Human-Computer Interaction with Mobile Devices and Services (pp. 17-28). ACM.

[3] Xu, C., Pathak, P. H., & Mohapatra, P. (2015, February). Finger-writing with smartwatch: A case for finger and hand gesture recognition using smartwatch. In Proceedings of the 16th International Workshop on Mobile Computing Systems and Applications (pp. 9-14). ACM.

[4] Gong, J., Yang, X.D. and Irani, P., 2016, October. WristWhirl: One-handed Continuous Smartwatch Input using Wrist Gestures. In Proceedings of the 29th Annual Symposium on User Interface Software and Technology (pp. 861-872). ACM.

[5] Chen, X.A., Grossman, T. and Fitzmaurice, G., 2014, October. Swipeboard: a text entry technique for ultra-small interfaces that supports novice to expert transitions. In Proceedings of the 27th annual ACM symposium on User interface software and technology (pp. 615-620). ACM.

[6] Oney, S., Harrison, C., Ogan, A. and Wiese, J., 2013, April. ZoomBoard: a diminutive qwerty soft keyboard using iterative zooming for ultra-small devices. In Proceedings of the SIGCHI Conference on Human Factors in Computing Systems (pp. 2799-2802). ACM.

[7] Wen, H., Ramos Rojas, J. and Dey, A.K., 2016, May. Serendipity: Finger gesture recognition using an off-the-shelf smartwatch. In Proceedings of the 2016 CHI Conference on Human Factors in Computing Systems (pp. 3847-3851). ACM.

[8] AccessibilityService, Android Developers https://developer.android.com/reference/android/accessibilityservice/AccessibilityService.html, last accessed: 02/02/2018

[9] Android wear, https://www.android.com/wear/, last accessed: 02/02/2018

[10] Navigate your watch with wrist gestures, Android Wear Help, https://support.google.com/androidwear/answer/6312406?hl=en, last accessed: 02/02/2018

[11] AccessibilityNodeInfo.AccessibilityAction, Android Developers, https://developer.android.com/reference/android/view/accessibility/AccessibilityNodeInfo.AccessibilityAction.html, last accessed: 02/02/2018

[12] AccessibilityNodeInfo.AccessibilityAction, Android Developers, https://developer.android.com/reference/android/hardware/Sensor.html, last accessed: 02/02/2018

[13] HandsFree Wear Source Code, github, https://github.com/jsalatas/HandsFreeWear, last accessed: 02/02/2018

[13.a] Let’s evolve a neural network with a genetic algorithm, https://blog.coast.ai/lets-evolve-a-neural-network-with-a-genetic-algorithm-code-included-8809bece164, last accessed: 02/03/2018

[14] Tensorflow, https://www.tensorflow.org/, last accessed: 02/02/2018

[15] Keras Ducumenntation, https://keras.io, last accessed: 02/02/2018

[16] HandsFree Wear Application, Google Play Store, https://play.google.com/store/apps/details?id=gr.ictpro.jsalatas.handsfreewear, last accessed: 02/02/2018

[17] Assistive Context-Aware Toolkit (ACAT), https://github.com/intel/acat, last accessed: 02/02/2018

Mobile based environment for foreign language learning: Application usage scenarios

1. Introduction
In our previous articles we presented a high level definition for a mobile based system for foreign language learning [1], as well as use case and sequence diagrams for the proposed system [2], which tries to bring into the foreign language teaching, the principles of active learning methodology introduced by the English scholar R.W. Revans [3].

In this article, we present two characteristic scenarios, which provide an insight into the core system’s functionalities and the tools that it can provide to foreign language teachers and students, giving them the ability to overcome the limits imposed by the traditional physical classroom and connect with other students, having similar interests, all over the world while participating in collaborating learning activities.

2. Scenarios
2.1. Students Introductions
As the academic year was about to end, Letitia, a primary school English teacher, from Spain and Maarten, also a primary school English teacher, from Netherlands, were discussing about the opportunity to have an online meeting with their fifth graders. The application was already used with great excitement by other teachers in their school, and Maarten though that it was a good idea, to get their students of A1 level online in order to get to know each other by introducing themselves. Letitia found the idea great, but she suggested that, in addition to the students’ introduction, each student could show off their favorite toys to each other, something that Maarten agreed to.

So, as a first step, after registering as teachers in the system, they created their classes and joined them in a group, so that they could have online meetings together, and instructed their students how to install the application in their mobile phones or tablets.

The two teachers, wanted to make sure that their students, knew the required vocabulary, in order to describe their toys, so they created a group assignment, in which every student could upload up to three photographs of their favorite toys. Having each student’s favorite toys photographs, they then created a glossary web page in which they add the uploaded photographs, along with a couple short phrases describing the toys (“This is my ball”, “This is my bicycle”, etc.) and a sound file with the pronunciation of each of these phrases.
After a couple of offline, traditional classroom, lectures in order to get the students familiar with the vocabulary and its usage, the two teachers, after deciding along with their student the best time of the meeting, created the online meeting and added all the students to it.

During the meeting the teachers instructed the students how to enable their mobile devices’ cameras and microphones (which was just a click of a button) and then enabled the students’ microphone one a time, having each student introduce himself and then showing the other students his favorite toys. The meeting was a great success and the students were really excited as, until now, they haven’t though that they have so many commons with kids living in a different country.

After the meeting, the teachers created a new assignment for their students, asking them to write a few sentences about who they met during the meeting and also what toys they liked most. The students would have access to the meeting’s recording and also to the glossary web page that was created before the meeting.

The two teachers also decided to allow the student’s parents to access to the meeting’s recording. They thought that it could provide a good marketing material for their schools and they were right. The student’s parents were impressed that their kids could participate in a discussion with other kids, after just a year of English teaching.

2.2. A virtual visit to museums
Gabriel, a 17 years old boy from France, was for many years interesting in Greek history and especially the classical period and have already visited the Louvre museum several times in order to see the Greek exhibits. In his English classroom (C2 level) he has met, in previous teacher guided online meetings, Nikos, a 17 years old boy from Greece, and Eleni, a 16 years old girl also from Greece, who were also learning English (C2 level) and who both shared the same interest about the Greek classical period with Gabriel.

Gabriel wanted for many years to visit Acropolis and the Acropolis museum in Athens, but so far he didn’t have the chance to do so. He thought that it could be a good idea to ask Nikos and Eleni to have a virtual tour. Nikos and Eleni where excited about the idea, as at the same time Gabriel could provide to them a virtual in Louvre museum, so they asked their teacher if they could have an online meeting for this. Their teachers agreed, but in addition to that they asked their students to write a wiki article about the Greek classical period. The three students agreed to that and setup an online meeting. Their teachers after approving the meeting, created a new project in the application, added the three students in it and also setup a wiki page for that project. Later they could move this wiki page to their schools’ public wiki.

Gabriel thought that it would be great if Simon, a 17 years old boy from England, who Gabriel met last year in a students’ exchange program, could join the meeting, as Simon could provide them a virtual tour to the Parthenon marbles, located in the British museum, and asked his teacher about this. His teacher, after consulting Simon’s and the other students’ teachers and parents agreed to this, so Simon installed the application in his mobile phone and registered to the system. Gabriel’s teacher approved his registration and added him in the project with the rest of the students.

Everything was setup up! At the meeting’s time every student was at his place: Gabriel inside Louvre’s museum, in front of the famous Aphrodite of Milos statues, taking photos that he could later use in the project’s wiki. Simon was already in Room 18, where the Parthenon marbles are kept and also taking photos and short videos with his mobile. Nikos was in the Acropolis, while at the same time Eleni was inside the Acropolis museum. After a short small talk about their day so far, and the introduction of Simon made by Gabriel to Nikos and Eleni, they started by asking Nikos go them through the various buildings in the Acropolis. Simon, has asked one of the museums guides to provide them some additional information about the history of the marbles and with the help of Nikos’ camera to show them their original location. Finally, they went through the exhibits in both Louvre and Acropolis museums through Gabriel’s and Eleni’s cameras respectively. They didn’t realize how fast 5 hours have past!

In order to organize their work, the four students asked their teachers to create a new forum for their project, in which they could upload any photos and videos they had from their visits in the museums and Acropolis as well as links to other material found on the internet. Later, they would arrange for additional online meetings in order to discuss the material and decide about the content to include in their project’s wiki page.

3. Conclusion – Next Steps
As we showed, the proposed system, can play a key role in a modern foreign language teaching classroom, providing new collaborative and interaction tools and connecting students with similar interests all over the world.

The applicability of such scenarios, needs of course to be verified outside of the lab, in real world conditions with real teachers and students. Such an evaluation will help us to pinpoint unforeseen issues, having to do either with the interaction of the users with the system, or technological limitations.

4. References
[1] Salatas, J. A proposal for developing a mobile based environment to help children learning a foreign language. ICT Research Blog. Retrieved July 28, 2014.
[2] Salatas, J. Mobile based environment for foreign language learning: Use cases and sequence diagrams. ICT Research Blog. Retrieved February 25, 2015.
[3] Weltman, D. (2007). A Comparison of Traditional and Active Learning Methods: An Empirical Investigation Utilizing a Linear Mixed Model. PhD Thesis. The University of Texas at Arlington, Texas.

WifiTags: An Adobe AIR Native Extension for getting available WiFi networks in Windows and Android Environments

1. Introduction

Adobe AIR is by design cross-platform and device-independent, but AIR applications can still access the capabilities and APIs of native platforms through AIR native extensions. A native code implementation provides access to device-specific features, enabling you to use platform-specific features, reuse existing native libraries, and achieve native-level speed for performance-sensitive code. These device-specific features are not available in the built-in ActionScript classes, and are not possible to implement in application-specific ActionScript classes. The native code implementation can provide such functionality because it has access to device-specific hardware and software.

In this article we present the implementation of such a native extension (WifiTags) for getting the available Wi-Fi networks (SSIDs) and their signal strength (RSSIs). Initially, we provide a brief description on the architecture of a native extension, we continue describing the implementation of the WifiTags extension, give an example for its usage and we conclude providing a real application scenario for its usage.

2. Adobe AIR native extension architecture

Figure 1 shows the interactions between the native extension, the AIR runtime, and the device [1].

AIR allows an extension to do the following [1]:

  • Call functions implemented in native code from ActionScript.
  • Share data between ActionScript and the native code.
  • Dispatch events from the native code to ActionScript.

When you create a native extension, you provide the following [1]:

  • ActionScript extension classes that you define. These ActionScript classes use the built-in ActionScript APIs that allow access to and data exchange with native code.
  • A native code implementation. The native code uses native code APIs that allow access to and data exchange with your ActionScript extension classes.
  • Resources, such as images, that the ActionScript extension class or the native code uses.

Your native extension can target multiple platforms. When it does, you can provide a different set of ActionScript extension classes and a different native code implementation for each target platform. [1]

Figure 1: Adobe AIR native extension architecture

Figure 1: Adobe AIR native extension architecture

3. Developing the native extension

The complete source for the WifiTags Adobe AIR native extension is available at [2], while the final built of the extension which can be used directly in Flash Builder is available at [3].

The extension consists of three parts:

  • The native windows library (WifiTagsWin).
  • The native android library (WifiTagsAndroid).
  • The ActionScript library (WifiTagsANE).

3.1. Windows native code

The native windows library is a C++ Microsoft Visual Studio 2013 project. The main functionality is implemented in the file WlanGetAvailableNetworkList.cpp and it is an adaptation of Microsoft Windows’ WlanGetAvailableNetworkList native Wifi function [4]. The interface to the ActionScript code is implemented in the file WifiTags.cpp and it provides two functions:

  • FREObject isSupported(FREContext ctx, void* funcData, uint32_t argc, FREObject argv[])
    Which returns true as this extension is supported in windows platforms
  • FREObject getWifiTags(FREContext ctx, void* funcData, uint32_t argc, FREObject argv[])
    Which returns a list of available Wi-Fi networks serialized in JSON format. A typical format of the return value is as follows:

    1
    2
    3
    4
    5
    
    {"ssids":[
         {"name":"ssid1", "strength":-50, "connected":true},
         {"name":"ssid2", "strength":-51, "connected":false},
         {"name":"ssid3", "strength":-57, "connected":false}
    ]}

    where for each network it is provided its name (SSID), its strength (RSSI) and its connected/disconnected status.

The project also include the linker’s library FlashRuntimeExtensions.lib and the related header FlashRuntimeExtensions.h as provided by Adobo AIR SDK 16.0.

3.2. Android native code

The native android library is a java based eclipse project. The interface to the ActionScript code is implemented in the file WifiTags.java, the FREContext is implemented in WifiTagsContext.java and it also provides two function which are implemented as separate classes:

  • SupportedFunction.java which provides the isSupported function and which again returns true as this extension is supported in windows platforms.
  • WifiTagsFunction.java which provides the getWifiTags functions and which again returns the list of available Wi-Fi networks serialized in JSON format.

3.3. ActionScript library code

The ActionScript library is and Adobe Flash Builder 4.6 projects which contains the WifiTags.as file which acts as a proxy to the native parts of the code. One thing worth mentioning is that the function getWifiTags deserializes the JSON passed from the native code and passes it to the caller as an ActionScript Object.

4. Using the native extension

Having the extension’s ane file [3], you can easily add it in a Flash Builder’s project as described at [5]. A typical code that uses the WifiTags extension is the following

1
2
3
4
5
6
7
8
9
10
11
12
13
14
15
import gr.ictpro.jsalatas.ane.wifitags.WifiTags;
 
protected function getAvailableWifis():void
{
     var wifiTags:WifiTags = new WifiTags();
     if(wifiTags.isSupported()) {
          var obj:Object = wifiTags.getWifiTags();
          var numberOfNetworks:int = obj["ssids"].length;
          for (var i:int = 0; i < numberOfNetworks; i++) {
               trace("SSID:" + obj["ssids"][i]["name"]);
               trace("RSSI:" + obj["ssids"][i]["strength"]);
               trace("Connected:" + obj["ssids"][i]["connected"]);
          }
     }
}

Notice that in order to use it in an Android device, you need the ACCESS_NETWORK_STATE and ACCESS_WIFI_STATE permissions.

5. Conclusion

In this article we presented the WifiTags native extension which provides the ability to get a list of available Wi-Fi networks in an Adobe AIR application which runs in a Windows or Android environment. The extension is tested in Windows 8.1 and Android 5.0 (Galaxy Note 3) environments and it should work on any PC running Windows 7/8.x and any Android device running at least Android 4.3.

This extension was created in order to be able to use the available Wi-Fi networks as location tags and to enable us to implement the location awareness features required in the Mobile Based Foreign Language Learning environment as described in our previous article [6].

6. References

[1] Adobe. 2015. Developing Native Extensions for ADOBE AIR. Retrieved April 5, 2015.

[2] WifiTags source code. Retrieved April 5, 2015.

[3] WifiTags: An Adobe AIR Native Extension for getting available WiFi networks in Windows and Android Environments. Retrieved April 5, 2015.

[4] WlanGetAvailableNetworkList function. Retrieved April 5, 2015.

[5] Adobe Flash Builder 4.7 – Use native extensions. Retrieved April 5, 2015.

[6] Salatas, J. 2015. Mobile based environment for foreign language learning: Use cases and sequence diagrams. Retrieved April 5, 2015.

Mobile based environment for foreign language learning: General implementation details and software architecture

1. Introduction

Following the analysis and design of the system as described in our previous articles [1] [2], in this article we present the initial implementation of the system, focusing on the general software architecture and providing a description of the full stack and tools used.

We start by describing the various software layers and the components they contain, followed by brief instructions on setting up a development/testing environment and running the application and we conclude with the next development steps.

2. Software Architecture

The full software stack is shown in Figure 1. The source code for all the system’s components shown in Figure 1 is available for checkout in a github repository [3]. The repository contains four distinct eclipse projects which will be described in the following sections.

System's full software stack

Figure 1: System’s full software stack

2.1. Server Side Architecture

The Server Side code is included in the MServer eclipse project. It is java based and for our developing purposes runs on top of the tomcat server (version 6.0) [4] and is compiled and executed with Oracle’s JDK 7 [5], but should work in any java web container and any Java Development Kit version 1.6 and above.

The project relies mainly on the Spring application framework [6], the Hibernate framework [7] for data persistence using a MySQL Database [8] as its RDBMS. In addition, BlazeDS [9] and BlazeDS Spring integration [10] is used for communication and data exchange with the client. All of the 3rd party libraries and frameworks dependencies needed to compile and run the project are handled by Maven project management tool [11].

2.1.1. Data Access

This layer consists of mainly three kind of components which reside in the gr.ictpro.mall.model package: Data Access Object (DAO) interfaces along with their implementations and the Java persistent objects for serializing data from and to the MySQL database.

2.1.2. Services

On top of the Data Access layer, lies the service layer with its components in gr.ictpro.mall.service package which again consists of the Service interfaces and their implementations which provide the logic to operate on the data passed from/to the higher layers to/from the Data Access layer.

2.1.3. BlazeDS Remote Services

This is the highest server side layer with its components in gr.ictpro.mall.flex package and provides the services required for communication and data exchange with the client. Its functionality is similar to that of the controller layer in a typical Spring MVC web application.

The data exchange with the client takes place through two Secure Action Message Format (AMF) [12] Channels one for client initiated connections and the one server initiated for pushing messages to the clients.

2.2. Client Side Architecture

The client side application is based on Adobe’s Flex [13], which an open source application framework for building and maintaining expressive web applications that deploy consistently on all major browsers, desktops, and devices, Adobe’s AIR [14] runtime environment, which enables developers to package the same code into native applications for Windows and Mac OS desktops as well as iOS and Android devices and ActionScript programming language [15].

On top of these the client side application utilizes the Robotlegs [16] MVCS (Model-View-Controller-Service) application framework for its architecture, in combination with ActionScript Signals [17] for providing a strongly-typed object-oriented alternative to the typical Actionscript Events and their String registry based approach to the Observer pattern [18].

The client code is divided in 4 separated eclipse projects as follows.

2.2.1. Mobile and Desktop Client

These two projects (named MobileClient and DesktopClient) contain the platform specific (android and Win/MacOSX respectively) parts of code, which currently consists only of the main application container (spark.components.Application and spark.components.WindowedApplication accordingly).

2.2.2. Common Library

The CommonLibrary Project is, as its name suggests, an actionscript library containing most of the application’s core components. It is referenced by both Mobile and Desktop Client applications.

2.2.3. External Modules

The CommonModules project contains a set of external modules, which are hosted as SWF files in the tomcat server and can be dynamically loaded at runtime extending the main application without the need of recompiling and redistributing the whole application.

Such modules can be for example games developed by 3rd party developers or different registration and authentication modules as the location aware registration and authentication discussed previously [2], which will implemented in a later step as alternatives to the standard username/password registration and authentication.

In general, these external modules should be configured as spring beans using xml in the server side similar to the existing authentication-providers.xml and registration-providers.xml files that can be found under the resources/spring folder in the MServer project.

As a final note, in order to overcome security limitations and sandboxes domains when loading external SWFs in mobile AIR applications, we implemented a workaround that firstly downloads the external SWF file and converts it into a byte Array and then passing this byte Array to the ModuleLoader and load its code into the application domain (the code is available in the gr.ictpro.mall.client.service. ExternalModuleLoader.as class in the CommonLibrary project). We believe that this approach doesn’t impose any security risks as the SWFs can only be hosted to the same tomcat installation which also host the server side application (i.e. it isn’t possible to load SWF files that are hosted in malicious servers).

3. Setting up a Development/Testing Environment

In order to setup a development/testing environment to compile and run the software, we need to perform some preliminary steps as described in the following sections. We deliberately omit all trivial/typical tasks (eg JDK, MySQL, tomcat installation etc) and focus on the components and configuration that need special attention.

3.1. Software and Libraries

3.1.1. Eclipse and Flash Builder Plugin

In addition to the standard eclipse IDE for Java EE Developers [19] which is recommended for editing, compiling and deploying the server side project (MServer), for editing and compiling the client (actionscript) code using eclipse, Adobe’s Flash Builder [20] 4.6 or later is required. Flash Builder supports installation as a plugin to an existing eclipse installation [21], so that the same eclipse IDE can be used for both client and server side development.

3.1.2. Adobe Flex and AIR SDKs

The client side eclipse projects as they are currently available in github [3], require Adobe’s Flex SDK version 4.6 with overlaid Adobe’s AIR SDK version 16.0 [22] as described in [23].

3.2. Configuration

Regarding the software configuration, there are two non-trivial tasks as follows:

3.2.1. Database Configuration

Before running the server side application, we need to create an empty MySQL database and setup Hibernate’s properties in order to be able to connect to that database.  On the most typical scenario, assuming that the MySQL database is running in the same machine as the rest of the development environment, we need to create a database (e.g. mall) and assign a user with full access to it (e.g. username: admin and password: myAdminPassword).

Having this, in the MServer eclipse project, we need to copy the file /resources/hibernate/hibernate.properties-template to /resources/hibernate/hibernate.properties and adjust its settings. For the typical example in the previous paragraph, the file’s contents should be as follows:

1
2
3
4
5
6
7
hibernate.connection.driver_class=com.mysql.jdbc.Driver
hibernate.connection.url=jdbc:mysql://localhost:3306/mall
hibernate.default_schema=mall
hibernate.default_catalog=mall
hibernate.connection.username=admin
hibernate.connection.password=myAdminPassword
hibernate.dialect=org.hibernate.dialect.MySQL5InnoDBDialect

Having that done, deploying the application and restarting the tomcat server, the database will be automatically populated by Hibernate using the Java’s persisting objects definitions.

3.2.2. Self-Signed Certificates

As an extra security, all communications between the server and the clients are SSL based which of course requires an SSL certificate to be installed in tomcat and we assume the during development and testing, this will be a self-signed certificate. In order to overcome the security warnings generated by the Adobe AIR runtime, we need to install the certificate as a trusted CA root. For the desktop application running in a Windows environment this can be done by simply following the instructions at [24]. In a similar way for the android application (running on a rooted android device) we just need to follow the instructions at [25].

We assume that the requirement for a rooted android device will not be valid in a production environment as it should be configured with a certificate signed by a trusted CA.

4. Running the Software

Having performed the previously described configuration steps, we should be able to run the client application. Although there are only a few features implemented, running the application would be helpful in order to validate the setup and configuration.

The application has been tested on a desktop running Windows 8.1 and on two android based devices (Samsung Galaxy Note 3 and ASUS TF701T) both running android 4.4.2. The screenshots below are generated in the Samsung Galaxy Note 3 device.

As final note, the user interface and the interaction with it should be considered for now as just a quick plain prototype which will be drastically improved and fined tuned in following steps. The GUI and its components currently use the basic AIR skin ignoring any device-specific characteristics like the screen size/resolution etc.  Skinning the GUI and adjusting it to the device (device context awareness) will be implemented in following steps.

When running the application for the first time we are presented with a Server Configuration Screen (Figure 2) in which we should fill the server name to which we are connected, and the main application’s (MServer) and External Modules paths.

Server Configuration Screen

Figure 2: Server Configuration Screen

Tapping on OK button and provided that the given information are correct, the application presents the Login Screen (Figure 3). Already registered users can enter their account information (username and password) and tap OK to login. Non registered users can tap on Register button in order to navigate to the Registration Screen (Figure 4) and register for a new account.

Login Screen

Figure 3: Login Screen

Registration Screen

Figure 4: Registration Screen

After a successful authentication, the user is transfer to the application’s Main Screen (Figure 5).

Main Screen

Figure 5: Main Screen

5. Conclusion – Future Work

In this article we presented the application’s core architecture, provided brief instructions on setting up and configuring a development/testing environment and finally presented a first preview of the steps required in order to run the client application, register and login into the system.

Obviously, the development is still in its initial stage and the application’s functionality and available features will be extended over time. Our next steps in the development process include an implementation of a bridge between the AIR runtime framework and the native API provided by the client’s operating system (android, windows and MacOSX) in order to be able to use any available sensors and in general retrieve information by the operating system that will help us to retrieve context information (such as network connection status, device capabilities, location data etc) and use these to improve the interaction with the application, like for example the (already mentioned) usage of location data in order to provide automatic authentication from known locations (like the user’s classroom or home). Furthermore, instead of requiring the users to manually enter the configuration details in the Server Configuration Screen, these details can be scanned from QR-codes using the device’s camera (if available). QR-codes created by the teachers can also be used for easing the registration procedure in the case of younger kids.

The GUI also requires several things to be done, like for example the creation of device specific flex skins (eg easily touchable controls for mobile devices) and also the implementation of the functionality required in order to be able to adapt the GUI to both the device and the user, based on related context information.

6. References

[1] Salatas, J. A proposal for developing a mobile based environment to help children learning a foreign language. ICT Research Blog. Retrieved February 25, 2015.

[2] Salatas, J. Mobile based environment for foreign language learning: Use cases and sequence diagrams. ICT Research Blog. Retrieved February 25, 2015.

[3] MobileForeignLanguageLearning repository on github. Retrieved February 25, 2015.

[4] Apache Tomcat. Retrieved February 25, 2015.

[5] Oracle Technology Network for Java Developers. Retrieved February 25, 2015.

[6] Spring Framework. Retrieved February 25, 2015.

[7] Hibernate ORM. Retrieved February 25, 2015.

[8] MySQL. Retrieved February 25, 2015.

[9] BlazeDS. Retrieved February 25, 2015.

[10] Grelle, J. (November 2011). Spring BlazeDS Integration Reference Guide. Retrieved February 25, 2015.

[11] Apache Maven. Retrieved February 25, 2015.

[12] Adobe Systems Inc. AMF 3 Specification. Retrieved February 25, 2015.

[13] Adobe Flex – Free, open-source framework. Retrieved February 25, 2015.

[14] Adobe AIR. Retrieved February 25, 2015.

[15] Adobe Developer Connection – ActionScript Technology Center. Retrieved February 25, 2015.

[16] Robotlegs AS3 Micro-Architecture. Retrieved February 25, 2015.

[17] as3-signals repository on github. Retrieved February 25, 2015.

[18] Robotlegs, AS3-Signals and the SignalCommandMap. Retrieved February 25, 2015.

[19] The Eclipse Foundation open source community website. Retrieved February 25, 2015.

[20] Adobe Flash Builder 4.7 Premium – Develop games and applications. Retrieved February 25, 2015.

[21] Flash Builder 4.6 Release Notes. Retrieved February 25, 2015.

[22] Download Adobe AIR SDK. Retrieved February 25, 2015.

[23] Overlay AIR SDK on Flex SDK. Retrieved February 25, 2015.

[24] Installing a Self-Signed Certificate as a Trusted Root CA in Windows Vista. Retrieved February 25, 2015.

[25] Giebels, S. Installing CAcert certificates on Android as ‘system’ credentials without lockscreen. Retrieved February 25, 2015.

Mobile based environment for foreign language learning: Use cases and sequence diagrams

1. Introduction

In our previous article we presented a high level definition for a mobile based system for foreign language learning. We presented the system’s architecture and the different user roles involved in the system along with the basic functionality for each of these roles. In the current article, we continue the analysis of the system by providing an initial set of UML use cases and sequence diagrams for the core functionality of the proposed system, divided into four broad categories. For each category a general description is given followed by the use case diagram and their specification.

2. Registration / Authentication

2.1. Use Cases
As we need the system to be safe from unauthorized access, the system should employ an advanced authentication/registration mechanism as shown in Figure 1. In its basic form, a new user’s registration should be approved by a teacher and the login procedure should be based on the typical username/password combination. The system should also provide the ability for convenient automatic registration approvals and password-less authentication by exploiting context information.

User registration and authentication use case diagram

Figure 1. User registration and authentication use case diagram

2.1.1. Register

Name: Register
Identifier: A1
Actors: User
Description: Describes the User’s registration procedure.
Precondition: No active login exists in the application that is running in the User’s device.
Basic Flow:
1. The User chooses the option “Create a new account” on the login screen of the UI.
2. The system presents the registration form.
3. The User enters the required information (username, password and an email account) and presses the “Submit” button.
4. The system validates the data making sure the username is unique, the email address has not been used for another registration and the password meets predefined complexity rules (length etc.).
5. The system creates the new user’s account and notifies the User that her registration is complete.
6. Include Use Case A2 “Approve Registration”
7. The use case ends in success condition.
Alternate Flow:
4.1. The system fails to validate one or more fields.
4.2. The system notifies the User about the fields failed to validate.
4.3. The use case ends in failure condition.
Post conditions:
Success: The User has a valid account and can now login to the system.
Failure: The User returns to the login screen of the UI.

2.1.2. New Registration Approval

Name: Approve Registration
Actors: Teacher
Identifier: A2
Description: Describes a user’s registration approval.
Precondition: A user has submitted her details in order to create a new user’s account.
Basic Flow:
1. The system sets the user’s account in disabled state and sends a notification containing an approval link to the Teacher.
2. The Teacher approves the new account by pressing the “Approve Account” link on the notification.
3. The system enables the user’s account and notifies the user.
4. The use case ends in success condition.
Alternate Flow:
1.1. The system using context information infers that a Teacher is in proximity and proceeds in step 3.
2.1. The Teacher doesn’t approve the new account (i.e. she ignores the notification)
2.2. The use case ends in failure condition.
Post conditions:
Success: The user has a valid account and can now login to the system.
Failure: The user cannot login to the system.

2.1.3. Reset Password

Name: Reset Password
Actors: User
Identifier: A3
Description: Describes how a User can reset her password in case she forgot it.
Precondition: No active login exists in the application that is running in the User’s device.
Basic Flow:
1. The User chooses the “Forgot my Password” option on the login screen of the UI.
2. The system presents the “Forgot my Password” form.
3. The User enters her email address and presses the “Submit” button.
4. The system verifies that the provided email address is associated with a user’s account and disables the current password.
5. The system sends an email to the User’s email address containing a one-time password reset link, and her user name.
6. The User presses the “Reset Password” link in the email.
7. The system verifies the one-time link and displays the “Reset Password” form.
8. The User enters a new password and pressed the “Submit” button.
9. The system updates the User’s account with the new password.
10. The use case ends in success condition.
Alternate Flow:
4.1. The provided email address is not associated with a user’s account.
4.2. The system notifies the User.
4.3. The use case terminates in Failure 1 condition.
6.1. The User doesn’t click on the provided one-time password reset link.
6.2. The use case terminates in Failure 2 condition.
Post conditions:
Success: The User’s password is reset and she can now use the new password login to the system.
Failure 1: The User’s password is not changed and the User is returned in the login screen of the UI.
Failure 2: The User’s password is disabled and she cannot login to the system.

2.1.4. Login

Name: Login
Actors: User
Identifier: A4
Description: Describes how a User logs in to the system.
Precondition: No active login exists in the application that is running in the User’s device.
Basic Flow:
1. The User chooses the “Login” option on the login screen of the UI.
2. The system presents the “Login” form.
3. The User enters her username and password and presses the “Submit” button.
4. The system verifies that the provided information is correct.
5. The system creates a new session for the User and destroys any other active sessions for the same User.
6. The use case ends in success condition.
Alternate Flow:
2.1. The system using context information infers that the User is trying to login from a location that has logged in again in the past and skips to step 5.
4.1. The provided username/password combination is not correct.
4.2. The system notifies the User.
4.3. The use case terminates in Failure condition.
Post conditions:
Success: The user is logged in to the system and she is now in the main screen of the UI.
Failure: The user is not logged in to the system and she is returned to the login screen of the UI.

2.2. Discussion

We deliberately didn’t include a typical “Remember me” functionality in order a user to be able to login without providing a username/password, as this could impose a security risk in case of stolen or lost mobile devices. In that case a malicious user could be able to use the system and impersonate the devices’ owner.

We understand that the fact that a teacher should approve every registration, as described in Use Case A2 (“Approve Registration”) and that a user should always provide a username/password in order to gain access to the system, may be inconvenient in many application’s scenarios, so the system should be designed in such way that it can be easily extended with other registration approval and authorization mechanisms, which will be presented in full detail in a future article.

Such mechanisms, may include context based approaches like proximity based authentication and registration approval where a user can register without approval or can login without providing a username/password combination, if a teacher is in proximity. In this case, the location proximity can be inferred by the system, using knowledge of the shared radio environment in a way similar to the work of Varshavsky et al. [1]

Furthermore, we propose the notion of trusted locations in which a user can login without providing a username/password combination. Such trusted locations, could be for example a user’s home. Our concern here is that as the system needs to store user’s location information, this should be done in a way that respects user’s privacy, using approaches as those described in the work of Narayanan et al. [2] or Puttaswamy et al. [3]. In [2] several secure protocols that support private proximity testing at various levels of granularity are described and is also studied the use of “location tags” generated from the physical environment in order to strengthen the security of proximity testing. In [3] LocX is introduced, which is a novel alternative that provides significantly improved location privacy without adding uncertainty into query results or relying on strong assumptions about server security. The key insight in LOcX is to apply secure user-specific, distance-preserving coordinate transformations to all location data shared with the server. The friends of a user share this user’s secrets so they can apply the same transformation.

3. Collaborative Activities

In this section we describe the use cases and the sequence diagram for the collaborative activities that are performed utilizing the BigBlueButton Server. We use the BigBlueButton’s term “meeting” for describing any type of collaboration activity.

3.1. Domain Model

The system should support different types of collaboration activities and should be easily extended with new ones. BigBlueButton already provides implementation for Chat, Video and Whiteboard modules which can be used to provide the core of Chat, Camera and Classroom functionality as described in our previous article [4]. In addition to these modules, a general abstract Game module will be created which would then be used as the base class for every game implementation. The Game module will follow the paradigm of the existing BigBlueButton’s Whiteboard which extend red5’s ApplicationAdapter class. Of course, these applications can be combined to provide rich client applications, for example a Classroom can contain a Whiteboard module, several Camera modules (one for each participant) and probably a Chat module.

Figure 2, depicts the high level Domain Diagram for the collaboration activities. The diagram also contains a sample game implementation which will be developed to demonstrate the concept. It is a port of the existing KTuberling game, which is a game intended for small children.  It is a “potato editor”. That means that you can drag and drop eyes, mouths, mustache, and other parts of face and goodies onto a potato-like guy. Similarly, you have other playgrounds with different themes. It will also spell out the name of the objects dragged and dropped in various languages that can be configured by the user [5]. A Teacher can setup different themes and sets of objects/scenes so that the Students can learn new vocabulary while playing.

Collaboration activities domain diagram

Figure 2: Collaboration activities domain diagram

3.2. Use Cases

Figure 3 provides the overall use case diagram for the collaboration activity. As the system may contain different types of meetings in which users can interact with each other, we don’t describe each meeting’s use case but a general (abstract) use case.

Collaboration activities use case diagram

Figure 3: Collaboration activities use case diagram

3.2.1. Schedule Meeting

Name: Schedule Meeting
Actors: Teacher or Student
Identifier: C1
Description: Describes how an Actor can schedule a meeting for a collaboration activity.
Precondition: The Actor is logged in to the system as either a Student or a Teacher.
Basic Flow:
1. The Actor selects the “Schedule a Meeting” option on the main screen of the UI.
2. The system provides the Actor with a list of available meeting types according to the Actor’s role.
3. The Actor selects a meeting type from the available list
4. The system displays a calendar.
5. The User selects a date and time for the schedule, and presses the “Schedule meeting” button on the calendar screen of the UI.
6. The system creates in the Actor’s calendar a pending new entry for the scheduled meeting.
7. Include Use Case C2 “Invite Users”
Post conditions:
Success: A new schedule for a meeting is entered in the participants’ calendars.
Failure: Nothing changes.

3.1.2. Invite Users

Name: Invite Users
Actors: Teacher or Student
Identifier: C2
Description: Describes how an Actor can invite users to join a scheduled meeting, she has created.
Precondition: The Actor has scheduled a meeting.
Basic Flow:
1. The Actor chooses the “Invite Users” option on the scheduled meeting screen of the UI.
2. The system provides the Actor with a list of users according to the Actor’s role (list of Teachers/Students in case she is a Student and additionally list of Parents in case she is a Teacher).
3. The Actor selects from the list the users she wants to invite and presses the “Invite Users” button on the list of users screen of the UI.
4. The system creates in the invited users’ calendars a pending new entry for the scheduled meeting, and sends them a notification.
5. For each invited user include Use Case C3 “Handle Invitation”
Post conditions:
Success: A new schedule for a meeting is entered in the participants’ calendars.
Failure: Nothing changes.

3.2.3. Handle Invitation

Name: Handle Invitation
Actors: User
Identifier: C3
Description: Describes how a User handles the invitation to join a scheduled meeting.
Precondition: The User has received a notification for an invitation to join a scheduled meeting.
Basic Flow:
1. The User presses the “Accept Invitation” link on the invitation’s notification.
2. The system updates the status of the meeting in User’s calendar as confirmed.
3. The use case ends in success condition.
Alternate Flow:
1.1. The User rejects the invitation or ignores the notification.
1.2 The use case ends in failure condition.
Post conditions:
Success: A new confirmed schedule for a meeting is entered in the participants’ calendars.
Failure: The pending scheduled meeting is removed from the User’s calendar.
Extension points:
2: Use Case C4: Approve Meeting.

3.2.4. Approve a Scheduled Meeting

Name: Approve Meeting
Actors: Teacher or Parent
Identifier: C4
Description: Describes how an Actor can approve a meeting in which only Students are participating.
Precondition: A Student has scheduled a new meeting and only other Students are invited.
Basic Flow:
1. The system sends a notification to the Student’s Parent and Teacher, informing them about the scheduled meeting.
2. The Actors approve the Student’s participation in the meeting by pressing the “Approve Meeting” link on the notification.
3. The system updates the status of the meeting in Student’s calendar as confirmed.
4. The use case ends in success condition.
Alternate Flow:
2.1. The Teacher or the Parent rejects the Student’s participation in the meeting or ignores the notification.
2.2 The use case ends in failure condition.
Post conditions:
Success: A new confirmed schedule for a meeting is entered in the Student’s calendar.
Failure: The pending scheduled meeting is not confirmed.

3.2.5. Join Meeting

Name: Join Meeting
Actors: User
Identifier: C5
Description: Describes how a User joins a meeting.
Precondition: A confirmed schedule for a meeting exists in the User’s calendar.
Basic Flow:
1. The system sends a reminding notification to the User a predefined amount of time before the meeting’s scheduled time.
2. The User presses the “Join Meeting” link on the notification.
3. The system joins the User to the meeting with the appropriate role (either a moderator or viewer) according to the meeting’s creator or type.
4. The use case ends in success condition.
Alternate Flow:
1.1. The User views the list of his scheduled meeting in the calendar.
1.2. The User selects the “Join Meeting” option for a meeting scheduled to begin in a predefined amount of time from now.
2.1. The User ignores the notification.
2.2 The use case ends in failure condition.
Post conditions:
Success: The User is joined in the meeting.
Failure: The User is not joined in the meeting.

3.3. Sequence Diagram

As we saw in our previous article when describing the system’s architecture [4], in the collaboration activities except from the client initiating the request, there are several involved servers for fulfilling it. The coordinator is the Management Server (MS) and the sequence of the exchanged messages for the Use Case C5 (“Join Meeting”) is shown in Figure 4. The MS server’s message exchange with the BS server should be either through BigBlueButton’s API [6] (e.g. getMeeting, create and join meeting API calls) or by using Red5’s Remote Shared Objects [7] (e.g. the “meeting destroyed” message).

Collaboration Activities Sequence Diagram

Figure 4: Collaboration Activities Sequence Diagram

4. E-learning Activities

In this section we describe the use cases and the sequence diagram for the E-learning activities that are performed utilizing the E-learning (Moodle) Server (ES).

4.1. Use Cases

Figure 5 provides the use case diagram for the course and test e-learning activities.

E-learning Activities Use Case diagram

Figure 5: E-learning Activities Use Case diagram

4.1.1. Manage Course

Name: Manage Course
Actors: Teacher
Identifier: E1
Description: Describes how a Teacher can manager (create, edit, delete, assign to Students) a course.
Precondition: The Teacher is logged in to the system.
Basic Flow:
1. The Teacher choose the “View Courses” option on the main screen of the UI.
2. The system displays a list of available courses.
3. The Teacher selects a course from the list of available courses.
4. The client application opens a web browser window pointing to the Moodle Server’s course page.
5. The Teacher makes the modifications she needs to the course.
6. The Teacher saves the modifications.
7. The use case ends in success condition.
Alternate Flow:
3.1. The Teacher creates a new course by pressing the “New Course” button in list of available courses screen of the UI.
5.1. The Teacher doesn’t perform any modifications.
5.2. The use case ends in failure condition.
6.1. The Teacher doesn’t save the modifications.
6.2. The use case ends in failure condition.
Post conditions:
Success: The course is updated according to the Teacher’s modifications.
Failure: The course is not updated.

4.1.2. Manage Test

Name: Manage Test
Actors: Teacher
Identifier: E2
Description: Describes how a Teacher can manager (create, edit, delete, assign to Students) a test.
Precondition: The Teacher is logged in to the system.
Basic Flow:
1. The Teacher choose the “View Tests” option on the main screen of the UI.
2. The system displays a list of available tests.
3. The Teacher selects a test from the list of available tests.
4. The client application opens a web browser window pointing to the Moodle Server’s test page.
5. The Teacher makes the modifications she needs to the test.
6. The Teacher saves the modifications.
7. The use case ends in success condition.
Alternate Flow:
3.1. The Teacher creates a new test by pressing the “New Test” button in the list of available tests screen of the UI.
5.1. The Teacher doesn’t perform any modifications.
5.2. The use case ends in failure condition.
6.1. The Teacher doesn’t save the modifications.
6.2. The use case ends in failure condition.
Post conditions:
Success: The test is updated according to the Teacher’s modifications.
Failure: The test is not updated.

4.1.3. Study Course

Name: Study Course
Actors: Student
Identifier: E3
Description: Describes how a Student can study a course assigned to her.
Precondition: The Student is logged in to the system.
Basic Flow:
1. The Student choose the “View Courses” option on the main screen of the UI.
2. The system displays a list of available courses.
3. The Student selects a course from her list of available courses.
4. The client application opens a web browser window pointing to the Moodle Server’s course page.
5. The Student is navigated to the point she has stopped last time, or to the beginning of the course if it is the first time she opens it.
6. The Student studies the course’s material.
7. The Student stop studying and exits the selected course.
8. The system keeps track of the point the Student has stopped.
9. The use case ends in success condition.
Post conditions:
The course’s progress is marked for the current Student.

4.1.4. Take Test

Name: Take Test
Actors: Student
Identifier: E4
Description: Describes how a Student can take a test assigned to her.
Precondition: The Student is logged in to the system.
Basic Flow:
1. The Student choose the “View Tests” option on the main screen of the UI.
2. The system displays a list of available tests.
3. The Student selects a test from her list of available test.
4. The client application opens a web browser window pointing to the Moodle Server’s test page.
5. The Student completes the test.
6. The system scores the Students performance, saves it in the database and marks the test as completed for the current Student.
7. The use case ends in success condition.
Post conditions:
Test is scored and marked as completed for the current Student.

4.2. Coordination between the Client Application, Management and E-learning (Moodle) Server.

As in case of the collaboration activities, in the e-learning activities except from the client initiating the request, there are several involved servers for fulfilling it. Given the web based nature of Moodle, the MS server’s role is limited to logging in to the ES server the current user using Moodle’s API [8] which would be exposed through web services [9] and then instructing the client application to navigate to the relevant Moodle’s web page. The client web browser should be integrated into the application similar to the example implementation provided at [10]. The sequence diagram for the Use Cases E3 (Study Course) and E4 (Take Test) is depicted in Figure 6.

E-learning activity sequence diagram

Figure 6: E-learning activity sequence diagram

4.3. Courses in Moodle
The E-learning activities will based in Moodle’s courses. A course in Moodle can be parameterized according to the teachers need and that functionality will be available in the system as follows.

A course can have different formats such as [11]

  1. Social format which is based on a single forum for the whole course. It’s useful for less formal courses.
  2. Topics format in which the course is broken down in a number of sections one for each topic. The teacher can add content, forums, quizzes, and other activities to each topic section.
  3. Weekly format in which the teacher can specify a course start date and the number of weeks the course is to run. A section will be created for each week of the course and the teacher can add content, forums, quizzes, and so on in the section for each week.

Each course can be composed of different types of resources such as [11]:

  1. Text pages which are simple pages of text. They don’t have many formatting options, but they are the simplest tool.
  2. Web pages which are HTML formatted pages and they can be created using the HTML editor provided by Moodle.
  3. Links to a files, directories or web sites which as its name implies, are links to external resources such as web sites or to resources uploaded in the Moodle server (files and/or directories).

Finally each course can contain activities for students such as [5]:

  1. Assignments which is a tool for collecting student work, either uploaded files or assignments created on- and offline.
  2. Forums which are threaded discussion boards.
  3. Glossaries which are dictionaries of terms that can be created for each week, topic, or course.
  4. Quizzes which are web-based quizzes with a variety of question types, such as multiple choice, true/false, short answer, and matching.
  5. Wikis which are collaboratively edited web pages.

5. Other (management) Activities

In this final section we describe the rest of core uses cases that just involve the Client Application and Management Server and are related to various management activities like user profile, calendar and notes management as described in the system’s high level description [4].

5.1. Use Cases

The use case diagram is depicted in Figure 7.

Management activities use case diagram

Figure 7: Management activities use case diagram

5.1.1. Manage

Name: Manage
Actors: User
Identifier: M1
Description: Describes how a User can manage her profile, calendar, notes or (if she is a Teacher) other users’ profiles.
Precondition: The User is logged in to the system.
Basic Flow:
1. The User chooses either “Manage Profile”, “Manage Calendar”, “Manage Notes”, or (if she is a Teacher) “Manage Users” on the main screen of the UI.
2. The system returns a list of manageable objects according to the User’s role and choice (calendar’s events, notes, or list of users).
3. The User selects a manageable object from the list.
4. The system displays an edit form according to the type of the selected object.
5. The User modifies the properties of the selected object.
6. The User saves the modifications.
7. The system updates the modified object in the database.
8. The use case ends in success condition.
Alternate Flow:
2.1. If the selected object is the User’s profile skip to step 4.
3.1. The User creates a new object if it is applicable according to her current choice (new note or calendar event) by pressing the “New Note” or “New Event” buttons accordingly.
5.1. The Users doesn’t perform any modifications.
5.2. The use case ends in failure condition.
6.1. The User doesn’t save the modifications.
6.2. The use case ends in failure condition.
Post conditions:
Success: The selected object is updated according to the User’s modifications.
Failure: The selected object is not updated.
Extension points:
2: Use Case M3: Share Note.

5.1.2. View Online Users

Name: View Online Users
Actors: User
Identifier: M2
Description: Describes how a User can view who is online according the User’s role rights.
Precondition: The User is logged in to the system.
Basic Flow:
1. The User chooses the “View online users” on the main screen of the UI.
2. The system returns a list of online users according the User’s role rights.
3. The use case ends.

5.1.3. Share Note

Name: Share Note
Actors: User
Identifier: M3
Description: Describes how a User can share a note she owns with other users.
Precondition: The User has selected a note she owns.
Basic Flow:
1. The User chooses the “Share Note” option on the notes screen of the UI.
2. The system returns a list of Teachers and Students (and Parents if the User is a Teacher).
3. The User selects from the list the user(s) she wants to share the note with and presses the “Share Note” button in the note’s screen of the UI.
4. The system notifies the users with which the note is shared.
3. The use case ends in success condition.
Alternate Flow:
3.1. The User doesn’t select any user from the list.
3.2. The use case ends in failure condition.
Post conditions:
Success: The note is shared with the selected users.
Failure: The note is not shared.

5.1.4. Review My Child(ren)

Name: Review My Child(ren)
Actors: Parent
Identifier: M4
Description: Describes how a Parent can review her child(ren)’s activities in the system.
Precondition: The Parent is logged in to the system.
Basic Flow:
1. The Parent chooses either “Review Notes”, “Review Calendar” or “Review Activity” on the main screen of the UI.
2. The system returns a list of objects according to the Parent’s choice.
3. The use case ends.
Extension points:
2: Use Case M5: Add Restriction.

5.1.5. Add Restriction

Name: Add Restriction
Actors: Parent
Identifier: M5
Description: Describes how a Parent can add a restriction to her child(ren)’s calendar.
Precondition: The Parent has selected her child(ren)’s calendar (in “Review Calendar”), or a scheduled meeting (in “Review Activity”).
Basic Flow:
1. The Parent selects a date (or date range) in the calendar.
2. The Parent adds time restrictions for the selected date or date range by pressing the “Add restriction” button on the calendar screen of the UI.
3. The system notifies the Student and her Teacher about the restriction.
4. The use case ends.
Alternate Flow:
1.1. The Parent selects a scheduled meeting from the list of her child(ren) activities.
1.2. The Parent disapproves her child(ren) joining that meeting by pressing the “Disapprove Meeting” button the scheduled meeting screen of the UI.
1.3. The system notifies the Student and her Teacher about the restriction.
1.4. The use case ends.
Post conditions:
A restriction for a Student is applied by her Parent.

6. Conclusion

In this article, we provided an initial set of UML use cases for the core functionality of the proposed system, trying to be as concise as possible by omitting obvious details such as CRUD operations in the various modification related use cases. We also provided a sequence diagram for the coordination of the collaborative activities and finally we raised some concerns related to securing the system from unauthorized access.

The described use cases and concerns raised would be good candidates for inclusion in the electronic survey which would be circulated to foreign language teachers.

7. References

[1] Varshavsky, A., Scannell, A., LaMarca, A., & De Lara, E. (2007). Amigo: Proximity-based authentication of mobile devices (pp. 253-270). Springer Berlin Heidelberg.

[2] Narayanan, A., Thiagarajan, N., Lakhani, M., Hamburg, M., & Boneh, D. (2011, February). Location Privacy via Private Proximity Testing. In NDSS.

[3] Puttaswamy, K. P., Wang, S., Steinbauer, T., Agrawal, D., El Abbadi, A., Kruegel, C., & Zhao, B. Y. (2014). Preserving location privacy in geosocial applications. Mobile Computing, IEEE Transactions on, 13(1), 159-173.

[4] Salatas, J. A proposal for developing a mobile based environment to help children learning a foreign language. ICT Research Blog. Retrieved July 28, 2014.

[5] The KDE Games Center – KTuberling Information. Retrieved August 03, 2014.

[6] API – bigbluebutton – Using the BigBlueButton 0.81 API. Retrieved July 28, 2014.

[7] Gong, S., Gregoire, P., Rossi, & D. Red5 – Reference Documentation Version 1.0. Red5 Open Source Flash Server. Retrieved July 28, 2014.

[8] Core APIs – MoodleDocs. Retrieved July 28, 2014.

[9] Web services – MoodleDocs. Retrieved July 29, 2014.


[10] Carr, D., & Gonzale, D. Using Flash CS4 and Adobe AIR to build custom browsers for e-learning and social networking. Adobe Developer Connection. Retrieved July 28, 2014.

[11] Cole, J., & Foster, H. (2007). Using Moodle: Teaching with the popular open source course management system. ” O’Reilly Media, Inc.”.

A proposal for developing a mobile based environment to help children learning a foreign language

(Update October 2016: A detailed text for this proposal can be found at [11])

1. Introduction

The main purpose of the proposed system is to help children learning a foreign language by promoting communication and language development skills through an engaging virtual collaboration environment in which children are encouraged to interact and communicate with other children from all over the world learning the same language.

The interaction would involve several kinds of activities, such as multiuser educational games, synchronous communications through video conference or text chatting and finally participation in virtual classrooms. The system should be easy to understand and use even by non-technical users such as teachers and young children. It should be also easily extendable, allowing programmers to develop new functionality without dealing with low level details.

Finally, the system’s software should be publicly available, distributed under an open source license, in order to attract more developers to contribute and of course more language teachers to adopt it as part of their teaching methodology.

2. Related Work

To our best of knowledge, there is currently no similar system available. The EU funded project Telecollaboration for Intercultural Language Acquisition (TILA) [1] which is currently active aims on creating similar systems as the proposed but there are currently no published papers about the specifications of such a system. In addition, the TILA project is focusing on secondary school students and furthermore it doesn’t seem to focus on mobile devices.

Karvounidis et al. in their work [2] developed a new integrated framework, which covers synchronous and asynchronous education for teaching and learning in higher education. This work led to the creation of an integrated suite, the Unisuite which is designed for all the existing operating systems used on desktops and on mobile devices and can operate smoothly in any browser [3].

Our proposal focuses mainly in mobile devices, which will enable a rather different approach in foreign language teaching methodology, based on the surrounding environment of the children (i.e. their home, their toys and in general their everyday life). Furthermore, at least in its initial stage, it focuses on primary school students. Of course, more in depth literature review is needed, which will follow in the near future.

3. Architecture Diagram

The architecture diagram, which follows a 3-tier approach, is shown in Figure 1. The concept is that clients (PCs/Laptops, Smart Phones and Tablets) initially connect to the Management Server (MS) which a) acts as a coordinator between the clients, the BigBlueButton Server (BS) [4] and the Elearning (Moodle) Server (ES) [5] and 2) offers additional functionality to the clients and middleware.

Architecture Diagram

Figure 1: Architecture Diagram

3.1. BigBlueButton Coordination

The role of the MS as a coordinator between the client and the BS is to provide the client with the details (room name, password, etc.) of an existing BigBlueButton (BBB) meeting room that the client wishes to join. In addition to this, MS can create a new meeting room on demand on behalf of the client and then again provide the details to all clients involved in this particular request. More details will be provided in the following sections.

3.2. Integration with Moodle

The system should be able to communicate with either a local or a remote moodle installation and integrate it, in order to offer additional functionality, such as delivering course contents materials, creating tests, etc.

3.3. Additional Functionality

This role of the MS is related to additional functionality offered or needed by the system, such as administrative/logistics related tasks (e.g. user management functionality like authentication, user profile management etc.). To accomplish this, it uses a Database Server (DS) which acts as storage for information saving/retrieval.

3.4. Other Characteristics: Context Aware Load Balancing and Optimization

It would be highly desirable for the MS to be able to handle multiple BSs for load balancing reasons. We assume that this could improve the clients’ experience. The selection of best BS available should be based on context information provided by the clients (e.g. geolocation, ping times from client to BS, etc.).
Furthermore, location awareness would enable to deliver content only when and where is necessary. That means for example that a voice stream will not be delivered to users who are located in the same location (e.g. the same physical classroom) with the speaker.

4. Client Application

For the client side BBB already provides a web based real-time client in Flash [6]. Since Flash 10, Flash is now available on Mac, UNIX, and PCs, and it provides the interface for collaboration with other users [7]. Furthermore, the Mconf team [8] already provides a BBB mobile client developed with Adobe Air framework [9]. Adobe Air was chosen for two reasons: it would be compatible with Android and iOS, and most important, it would be implemented in the same programming language of the web client, envisioning that in the future we could have the same code base for both the mobile and the web client.

The BBB AIR client is still in active development and there are some things left before it is ready for production use. Some of the things left on the list are implementing the whiteboard, fixing the iOS version, and squashing as many bugs as possible. [10]

4.1. User and Device Context Awareness

Both the web/desktop and mobile client should be able to adapt to the user and device that is running by exploiting context information such as:

  • User’s role: There are three different roles used by the application: the student, the teacher and the parent which will be described in more detail in following sections.
  • User’s cultural background: Given that the system will be used by different users all around the world, it should be able to adapt to different cultures. Mainly that means that the client should support both left-to-right and right-to-left layout and the user interface should support multiple languages.
  • Student’s age: Given the student’s age, the user interface should be able to adapt its icons, colors and font styles in addition to the cultural adaptation described previously. Furthermore it should support different wording for GUI elements such as label texts that are displayed in menu or button items etc.
  • Device specifications: Finally, the client should consider the device’s specifications and capabilities such as display size and resolution, available sensors (e.g. microphones, web cameras), etc.

5. Users Roles

As mentioned, there are three different roles used by the application: the student, the teacher and the parent. After a user is logged in to the system, she is provided with a different set of functionality as described below.

5.1. Student

This is the role that all participating children are assigned to. The functionality offered by the application is shown in Figure 2.

Student's Application Diagram

Figure 2: Student’s Application Diagram

A student first of all can manage (i) her personal details (Manage → My Profile) which provide information such as her name, age, contact information etc., (ii) her calendar (Manage → My Calendar) which provide information about future tasks (e.g. scheduled online meetings), (iii) her notes (Manage → My Notes) which are notes that she may take while using the application. She can attend a scheduled teacher based online classroom (Learn → Classroom), communicate with other children via video conference (Talk → Camera) or text chat (Talk → Chat), or participate in an online multiplayer game chosen from a list of available games (Play → List of Games). She can also see who is online either teachers (Who is Online → List of Teachers) or other children (Who is Online → List of Students). Furthermore, she can also access courses materials (Learn → Courses) or take an online test for a course she is attending (Learn → Tests). Finally, in her interaction with other children (in a video conference, text chat or while playing a game), she can ask for help from any teacher who is currently online and available.

5.2. Teacher

As its name implies, this the teacher’s role. The functionality offered by the application is shown in Figure 3.

Teacher’s Application Diagram

Figure 3: Teacher’s Application Diagram

As with the student role, a teacher can also manage various things like (i) her profile (Manage → My Profile), (ii) her calendar (Manage → My Calendar), (iii) her notes (Manage → My Notes) and finally her students (Manage → My Students). She can join as a moderator an already scheduled or schedule a new online classroom (Teach → Classroom) and she can also view and join any other active online room created by children (Assist → List of Rooms), or respond to any pending help requests from the students (Assist → List of Help Requests). Furthermore, she can edit an existing or create a new course (Teach → Courses), or online test (Teach → Tests). Finally, she can see who is online either children (Who is Online → List of Students) or other teachers (Who is Online → List of Teachers), or children’s parents (Who is Online → List of Parents).

5.3. Parent

The final role is that of a child’s parent. This is the most limited role and its functionality is shown in Figure 4.

Parent's Application Diagram

Figure 4: Parent’s Application Diagram

The parent’s main functionality is related to supervising his child’s activities inside the system. So further to her profile (Manage → My Profile) and notes (Manage → My Notes) management, she can watch the current status and activity of her child (Review → My Child(ren)), view and apply time and/or date restrictions in her child’s calendar (Review → Calendar) and finally see her child’s past activities inside the system (Review → Activity) or notes about her child shared by a teacher (Review → Notes).

6. Conclusion – Next Steps

In this article, we presented a first draft proposal for developing a system to help foreign language teaching and learning through a virtual collaboration environment. The system’s architecture and a high level description of its functionality were described and we also briefly tried to present related works.

Apart from an in depth literature review, next steps involve more detailed analysis of the system’s requirements, by providing mostly Use Cases and Scenarios and also any other type of UML diagram that may be required. Finally, an electronic survey should be circulated to foreign language teachers, in order to determine the current use of ICT in foreign language teaching, capture any additional requirements for the proposed system and also try to determine the impact and acceptance of the proposed system among the foreign language teachers’ community.

7. References

[1] Jauregi, K., Melchor-Couto, S., & Beltrán, E. V. (2013, November). The European Project TILA. In 20 Years of EUROCALL: Learning from the Past, Looking to the Future: 2013 EUROCALL Conference, Évora, Portugal, Proceedings (p. 123). Research-publishing.net.

[2] Karvounidis, T., Chimos, K., Bersimis, S., & Douligeris, C. (2012, April). An integrated self-evaluated framework for embedding Web 2.0 technologies in the educational process. In Global Engineering Education Conference (EDUCON), 2012 IEEE (pp. 1-7). IEEE.

[3] Chimos, K., Douligeris, C., Karvounidis, T., Basios, M., & Bersimis, S. (2013, March). Unisuite: An innovative integrated suite for delivering synchronous and asynchronous online education. In Global Engineering Education Conference (EDUCON), 2013 IEEE (pp. 400-404). IEEE.

[4] Home – BigBlueButton. Retrieved July 6, 2014.

[5] Moodle – Open-source learning platform | Moodle.org. Retrieved July 21, 2014.

[6] Flash Player | Adobe Flash Player | Overview. Retrieved July 6, 2014.

[7] Overview of BigBlueButton’s Architecture. Retrieved July 6, 2014.

[8] Mconf | An opensource multiconference system for web and mobile. Retrieved July 6, 2014.

[9] Adobe AIR | Deploy applications. Retrieved July 6, 2014.

[10] bbb-air-client – Google Groups. Retrieved July 6, 2014.

[11] Salatas, J. (2016, September). Implementation of a distributed mobile based environment to help children learning a foreign language. Master Thesis. Hellenic Open University.

Java FST framework API Review

Foreword

This article summarizes and updates various previous articles [1] related to the implementation of a java weighted finite states transducers framework that can use existing openFst [2] models or export java fst object to openFst format and which is available at the CMUSphinx SVN reopsitory at [3].

The following sections include brief descriptions of the main parts and functionality of the framework. In addition to these descriptions, the full java docs are available at [4]

1. Semirings

As described in [5] the fst’s states and arcs weights may represent any set so long as they form a semiring. The semirings related classes are located in edu.cmu.sphinx.fst.semiring package.

There are 3 different semiring implementations TropicalSemiring, LogSemiring and ProbabilitySemiring all inheriting the abstract Semiring class and all of them accept float values.

2. Basic fst classes

The basic fst classes are located under the edu.cmu.sphinx.fst package.

There exist a mutable and an immutable fst implementations in Fst and ImmutableFst classes respectively. The mutable fst holds an ArrayList of State objects allowing additions/deletions. On the other hand the immutable fst holds a fixed size array of ImmutableState objects not allowing additions/deletions.

Similar to the mutable and immutable fst implementations above, a mutable State object holds its outgoing Arc objects in an ArrayList allowing additions/deletions, in contrast with an ImmutableState which holds its outgoing Arc objects in a fixed size array not allowing additions/deletions.

Finally the Arc class implement the fst’s arc functionality, containing basically properties and their getters and setters methods.

3. Fst operations

The supported fst operations are located under the edu.cmu.sphinx.fst.operations package and include the following classes

ArcSort Sorts the arcs in an FST per state. Sorting can be applied either on input or output label based on the provided comparator.

Compose Computes the composition of two Fsts. The two Fsts are augmented in order to avoid multiple epsilon paths in the resulting Fst. [6]

Connect Trims an Fst, removing states and arcs that are not on successful paths.

Determinize Determinizes an fst providing an equivalent fst that has the property that no state has two transitions with the same input label. For this algorithm, epsilon transitions are treated as regular symbols. [7]

ExtendFinal Adds a new final state with a 0.0 (Semiring’s 1) final wight and connects the current final states to it using epsilon transitions with weight equal to the original final state’s weight.

NShortestPaths Calculates the shortest distances from each state to the final. [8]

Project Projects an fst onto its domain or range by either copying each arc’s input label to its output label or vice versa.

Reverse Reverses an fst.

RmEpsilon Removes epsilon transitions from an fst. It return a new epsilon-free fst and does not modify the original fst

4. Working with openFst models

The class Convert in edu.cmu.sphinx.fst.openfst package provides the required methods to read (importFst) or write (exportFst) an openFst model in text format. In the same package there are also two additional classes named Import and Export for exposing the import/export functionality through main functions to a shell command.

Conclusion

The java fst framework described in this article and its implemented functionality, were created for the needs of the to the new grapheme-to-phoneme (g2p) feature in CMU Sphinx-4 speech recognizer [9].

It’s usage and extensive testing in the sphinx-4 g2p decoder suggest that the java fst framework and its  implemented functionality are usable in general, although it may luck functionality required in different applications (eg. additional operations).

References

[1] Java FST Framework

[2] OpenFst Library Home Page

[3] Java FST Framework SVN Repository

[4] FST Framework javadocs

[5] J. Salatas, “Porting openFST to java: Part 1”, ICT Research Blog, May 2012.

[6] M. Mohri, “Weighted automata algorithms”, Handbook of Weighted Automata. Springer, pp. 213-250, 2009.

[7] M. Mohri, “Finite-State Transducers in Language and Speech Processing”, Computational Linguistics, 23:2, 1997.

[8] M. Mohri, “Semiring Framework and Algorithms for Shortest-Distance Problems”,  Journal of Automata, Languages and Combinatorics, 7(3), pp. 321-350, 2002.

[9] J. Salatas, “Using the grapheme-to-phoneme feature in CMU Sphinx-4”, ICT Research Blog, May 2012.

Using the grapheme-to-phoneme feature in CMU Sphinx-4

Foreword

This article summarizes and updates the previous articles [1] related to the new grapheme-to-phoneme (g2p) feature in CMU Sphinx-4 speech recognizer [2].

In order to support automatic g2p transcription in Sphinx-4 there were created a new weighted finite state transducers (wfst) in java [3] which its current API will be presented in a future article. There were also created various new applications for which its installation procedure and usage will be presented in the following sections.

The procedures presented here were verified using openSuSE 12.1 x64 under a VirtualBox machine, but should apply to all recent linux distributions (either 32 or 64 bit). They assume that you are logged in a user test and all required software is saved under /home/test/cmusphinx directory. As a final note, the various commands outputs where omitted in this article, but should be watched for any errors or information especially in case of troubleshooting.

1. Installation

1.1. Required 3rd party libraries and applications

The following 3rd libraries should be installed in your system, before installing and running the main applications. As a notice these are only required in order to train new g2p models. They are not required if you want to use a g2p model in Sphinx-4.

1.1.1. OpenFst

OpenFst [4] is a library written in C++ for constructing, combining, optimizing, and searching weighted finite-state transducers (FSTs). You can download the latest version available at [4]. This article uses version 1.3.2.

test@linux:~/cmusphinx> wget http://www.openfst.org/twiki/pub/FST/FstDownload/openfst-1.3.2.tar.gz
...
test@linux:~/cmusphinx> tar -xzf openfst-1.3.2.tar.gz
test@linux:~/cmusphinx> cd openfst-1.3.2/
test@linux:~/cmusphinx/openfst-1.3.2> ./configure --enable-compact-fsts --enable-const-fsts --enable-far --enable-lookahead-fsts --enable-pdt
...
test@linux:~/cmusphinx/openfst-1.3.2> make
...
test@linux:~/cmusphinx/openfst-1.3.2> sudo make install
...
test@linux:~/cmusphinx/openfst-1.3.2> cd ..

1.1.2. OpenGrm NGram

The OpenGrm NGram library [5] is used for making and modifying n-gram language models encoded as weighted finite-state transducers (FSTs). It makes use of functionality in the OpenFst library to create, access and manipulate n-gram models. You can download the latest version available at [5]. This article uses version 1.0.3.

test@linux:~/cmusphinx> wget http://www.openfst.org/twiki/pub/GRM/NGramDownload/opengrm-ngram-1.0.3.tar.gz
...
test@linux:~/cmusphinx> tar -xzf opengrm-ngram-1.0.3.tar.gz
test@linux:~/cmusphinx> cd opengrm-ngram-1.0.3/
test@linux:~/cmusphinx/opengrm-ngram-1.0.3> ./configure
...
test@linux:~/cmusphinx/opengrm-ngram-1.0.3> make
...

In case the make command fail to complete in 64bit operating systems, try re-executing the configure command and rerun make as follows

test@linux:~/cmusphinx/opengrm-ngram-1.0.3> ./configure LDFLAGS=-L/usr/local/lib64/fst
...
test@linux:~/cmusphinx/opengrm-ngram-1.0.3> make
...
test@linux:~/cmusphinx/opengrm-ngram-1.0.3> sudo make install
...
test@linux:~/cmusphinx/opengrm-ngram-1.0.3> cd ..

1.2. Main applications

1.2.1. SphinxTrain

Having openFst and openGrm libraries installed, the training of a new model can be achieved  in  SphinxTrain while training a new acoustic model [6].

test@linux:~/cmusphinx> svn co https://cmusphinx.svn.sourceforge.net/svnroot/cmusphinx/trunk/sphinxbase
...
test@linux:~/cmusphinx> svn co https://cmusphinx.svn.sourceforge.net/svnroot/cmusphinx/trunk/sphinxbase
...
test@linux:~/cmusphinx> svn co https://cmusphinx.svn.sourceforge.net/svnroot/cmusphinx/trunk/pocketsphinx
...
test@linux:~/cmusphinx> svn co https://cmusphinx.svn.sourceforge.net/svnroot/cmusphinx/trunk/SphinxTrain
...
test@linux:~/cmusphinx> cd sphinxbase/
test@linux:~/cmusphinx/sphinxbase> ./autogen.sh
...
test@linux:~/cmusphinx/sphinxbase> make
...
test@linux:~/cmusphinx/sphinxbase> sudo make install
...
test@linux:~/cmusphinx> cd ../pocketsphinx/
test@linux:~/cmusphinx/sphinxbase> ./autogen.sh
...
test@linux:~/cmusphinx/sphinxbase> make
...
test@linux:~/cmusphinx/sphinxbase> sudo make install
...
test@linux:~/cmusphinx/sphinxbase> cd ../SphinxTrain/
test@linux:~/cmusphinx/SphinxTrain> ./autogen.sh –enable-g2p-decoder
...
test@linux:~/cmusphinx/SphinxTrain> make
...
test@linux:~/cmusphinx/SphinxTrain> sudo make install
...
test@linux:~/cmusphinx/SphinxTrain>

1.2.2. Sphinx-4

The g2p decoding functionality was introduced in revision 11556 in SVN. Further to sphinx-4, you need also to checkout the latest revision of the java fst framework

test@linux:~/cmusphinx> svn co https://cmusphinx.svn.sourceforge.net/svnroot/cmusphinx/branches/g2p/fst
...
test@linux:~/cmusphinx> svn co https://cmusphinx.svn.sourceforge.net/svnroot/cmusphinx/trunk/sphinx4
...
test@linux:~/cmusphinx> cd fst
test@linux:~/cmusphinx/fst> ant jar
...
test@linux:~/cmusphinx/fst> cp dist/fst.jar ../sphinx4/lib/
test@linux:~/cmusphinx/fst> cd ../sphinx4/lib/
test@linux:~/cmusphinx/sphinx4/lib> ./jsapi.sh
...
test@linux:~/cmusphinx/sphinx4/lib> cd ..
test@linux:~/cmusphinx/sphinx4/lib> ant
...
test@linux:~/cmusphinx/sphinx4/lib>

2. Training a g2p model

2.1. Training through SphinxTrain

Training an acoustic model following the instructions found at [6], can train also a g2p model.

As an addition to [6], for the current revision of SphinxTrain (11554). after running the sphinxtrain -t an4 setup command, you need to enable the g2p functionality by setting the $CFG_G2P_MODEL variable in the same file to

$CFG_G2P_MODEL= 'yes';

running sphinxtrain run according to [6] will produce an output related to the g2p model training similar to the following
...
MODULE: 0000 train grapheme-to-phoneme model
Phase 1: Cleaning up directories: logs...
Phase 2: Training g2p model...
Phase 3: Evaluating g2p model...
INFO: cmd_ln.c(691): Parsing command line:
/usr/local/lib/sphinxtrain/phonetisaurus-g2p \
-model /home/test/cmusphinx/an4/g2p/an4.fst \
-input /home/test/cmusphinx/an4/g2p/an4.words \
-beam 1500 \
-words yes \
-isfile yes \
-output_cost yes \
-output /home/test/cmusphinx/an4/g2p/an4.hyp
Current configuration:
[NAME]  [DEFLT] [VALUE]
-beam  500 1500
-help  no  no
-input     /home/test/cmusphinx/an4/g2p/an4.words
-isfile    no yes
-model     /home/test/cmusphinx/an4/g2p/an4.fst
-nbest  1  1
-output     /home/test/cmusphinx/an4/g2p/an4.hyp
-output_cost  no yes
-sep
-words  no yes
Words: 13  Hyps: 13 Refs: 13
(T)otal tokens in reference: 50
(M)atches: 46  (S)ubstitutions: 1  (I)nsertions: 4  (D)eletions: 3
% Correct (M/T)           -- %92.00
% Token ER ((S+I+D)/T)    -- %16.00
% Accuracy 1.0-ER         -- %84.00
(S)equences: 13  (C)orrect sequences: 8  (E)rror sequences: 5
% Sequence ER (E/S)       -- %38.46
% Sequence Acc (1.0-E/S)  -- %61.54
Phase 4: Creating pronunciations for OOV words...
Phase 5: Merging primary and OOV dictionaries...
...

The training process generates an additional dictionary for training transcription words not found in the dictionary, and creates pronunciations for them using the trained g2p model. After the training is completed, the model can be found under g2p dir. The openfst binary model is the an4.fst file. If you plan to convert it to a java binary model and use it in Sphinx-4, you need also the openfst text format which consist of the main model file (an4.fst.txt) and the two additional symbol files (an4.input.syms and an4.output.syms).

2.2. Training using the standalone application

Although the default training parameters provide a relative low Word Error Rate (WER), it might be possible to further fine tune the various parameters and produce a model with even lower WER. Assuming that the directory /home/test/cmusphinx/dict contains the cmudict.0.6d dictionary, a model can be build directly from the command line as follows
test@linux:~/cmusphinx/dict> export PATH=/usr/local/lib/sphinxtrain/:$PATH
test@linux:~/cmusphinx/dict> g2p_train -ifile cmudict.0.6d
INFO: cmd_ln.c(691): Parsing command line:
g2p_train \
-ifile cmudict.0.6d
Current configuration:
[NAME]          [DEFLT]         [VALUE]
-eps            <eps>           <eps>
-gen_testset    yes             yes
-help           no              no
-ifile                          cmudict.0.6d
-iter           10              10
-noalign        no              no
-order          6               6
-pattern
-prefix         model           model
-prune          no              no
-s1s2_delim
-s1s2_sep       }               }
-seq1in_sep
-seq1_del       no              no
-seq1_max       2               2
-seq2in_sep
-seq2_del       no              no
-seq2_max       2               2
-seq_sep        |               |
-skip           _               _
-smooth         kneser_ney      kneser_ney
-theta          0               0.000000e+00
Splitting dictionary: cmudict.0.6d into training and test set
Splitting...
Using dictionary: model.train
Loading...
Starting EM...
Iteration 1: 1.23585
Iteration 2: 0.176181
Iteration 3: 0.0564651
Iteration 4: 0.0156775
Iteration 5: 0.00727272
Iteration 6: 0.00368118
Iteration 7: 0.00259113
Iteration 8: 0.00118828
Iteration 9: 0.000779152
Iteration 10: 0.000844955
Iteration 11: 0.000470161
Generating best alignments...
Generating symbols...
Compiling symbols into FAR archive...
Counting n-grams...
Smoothing model...
Minimizing model...
Correcting final model...
Writing text model to disk...
Writing binary model to disk...
test@linux:~/cmusphinx/dict>

the model then can be evaluated through the command line as follows

test@linux:~/cmusphinx/dict> /usr/local/lib64/sphinxtrain/scripts/0000.g2p_train/evaluate.py /usr/local/lib/sphinxtrain/ model.fst model.test eval
INFO: cmd_ln.c(691): Parsing command line:
/usr/local/lib/sphinxtrain/phonetisaurus-g2p \
-model /home/test/cmusphinx/an4/g2p/an4.fst \
-input /home/test/cmusphinx/an4/g2p/an4.words \
-beam 1500 \
-words yes \
-isfile yes \
-output_cost yes \
-output /home/test/cmusphinx/an4/g2p/an4.hyp
Current configuration:
[NAME]  [DEFLT] [VALUE]
-beam  500 1500
-help  no  no
-input     /home/test/cmusphinx/an4/g2p/an4.words
-isfile    no yes
-model     /home/test/cmusphinx/an4/g2p/an4.fst
-nbest  1  1
-output     /home/test/cmusphinx/an4/g2p/an4.hyp
-output_cost  no yes
-sep
-words  no yes
Words: 12946  Hyps: 12946 Refs: 12946
(T)otal tokens in reference: 82416
(M)atches: 74816  (S)ubstitutions: 6906  (I)nsertions: 1076  (D)eletions: 694
% Correct (M/T)           -- %90.78
% Token ER ((S+I+D)/T)    -- %10.53
% Accuracy 1.0-ER         -- %89.47
(S)equences: 12946  (C)orrect sequences: 7859  (E)rror sequences: 5087
% Sequence ER (E/S)       -- %39.29
% Sequence Acc (1.0-E/S)  -- %60.71
test@linux:~/cmusphinx/dict>

3. Using a g2p model in Sphinx-4

Having the openfst text format trained model (this should be located in directory /home/test/cmusphinx/dict) of previous section, in order to use it in sphinx-4, it needs to be converted in the java fst binary format, as follows

test@linux:~/cmusphinx/dict> cd ../fst/
test@linux:~/cmusphinx/fst> ./openfst2java.sh ../dict/model ../sphinx4/models/model.fst.ser

and to use it in an application, add the following lines to the dictionary component in the configuration file

1
2
3
4
        <property name="allowMissingWords" value="true"/>
        <property name="createMissingWords" value="true"/>
        <property name="g2pModelPath" value="file:///home/test/cmusphinx/sphinx4/models/model.fst.ser"/>
        <property name="g2pMaxPron" value="2"/>

notice that the "wordReplacement" property should not exist in the dictionary component. The property "g2pModelPath" should contain a URI pointing to the g2p model in java fst format. The property "g2pMaxPron" holds the value of the number of different pronunciations generated by the g2p decoder for each word. For more information about sphinx-4 configuration can be found at [7].

Conclusion
This article tried to summarize the recent changes related to the new grapheme-to-phoneme (g2p) feature in CMU Sphinx-4 speech recognizer, from a user’s perspective. Other articles will present the API of the new java fst framework, created for the g2p feature, and it will follow a detailed performance review of the g2p decoder and the java fst framework in general.
As a future work suggestion, it would be interesting to evaluate the g2p decoder in automatic speech recognition context as the measure of of pronunciation variants that are correctly produced, and the number of incorrect variants generated, might not be directly related to the quality of the generated pronunciation variants when used in automatic speech recognition[8].

References
[1] “GSoC 2012: Letter to Phoneme Conversion in CMU Sphinx-4”
[2] CMUSphinx Home Page
[3] Java Fst Framework
[4] OpenFst Library Home Page
[5] OpenGrm NGram Library
[6] Training Acoustic Model For CMUSphinx
[7] Sphinx-4 Application Programmer’s Guide
[8] D. Jouvet, D. Fohr, I. Illina, “Evaluating Grapheme-to-Phoneme Converters in Automatic Speech Recognition Context”, IEEE International Conference on Acoustics, Speech, and Signal Processing, March 2012, Japan

Porting openFST to java: Part 4

Notice: Parts of this article may be outdated. There are many changes to its API and performance improvements recently in the java fst framework.  Please refer to recent articles in Java FST Framework category for the latest info.

Foreword

This article, the fourth in a series regarding porting openFST to java, describes the latest version of the java fst library, which contains all the required code for porting phonetisaurus g2p decoder [1] to java and eventually integrate it with sphinx4.

1. Basic Usage

Creating as simple wfst like the one in in figure 1 below is a straightforward procedure

Figure 1: Example weighted finite-state transducer

Figure 1: Example weighted finite-state transducer

1
2
3
4
5
6
7
8
9
10
11
12
13
14
15
16
17
18
19
20
21
22
23
24
25
26
27
28
29
30
31
32
33
34
35
36
37
38
39
		// Create a new Semiring
		TropicalSemiring ts = new TropicalSemiring();
		// Create the wfst
		Fst<Double> wfst = new Fst<Double>(ts);
		// Create input and output symbol tables 
		// and assign these to the wfst  
		Mapper<Integer, String> isyms = new Mapper<Integer, String>();
		isyms.put(0, "a");
		isyms.put(1, "b");
		isyms.put(2, "c");
		wfst.setIsyms(isyms);
 
		Mapper<Integer, String> osyms = new Mapper<Integer, String>();
		osyms.put(0, "x");
		osyms.put(1, "y");
		osyms.put(2, "z");
		wfst.setIsyms(osyms);
 
		// Create state 0
		State<Double> state = new State<Double>(ts.zero());
		// Add it to the wfst
		wfst.addState(state);
		// Set it as the start state
		wfst.setStart(s.getId());
		// Add arcs to state 0 
		state.addArc(new Arc<Double>(0, 0, 0.5, "1"));
		state.addArc(new Arc<Double>(1, 1, 1.5, "1"));
 
		// Create state 1
		state = new State<Double>(ts.zero());
		// Add it to the wfst
		wfst.addState(state);
		// Add arcs to state 1
		state.addArc(new Arc<Double>(2, 2, 2.5, "2"));
 
		// Create (final) state 2
		state = new State<Double>(new Weight<Double>(3.5));
		// Add it to the wfst
		wfst.addState(state);

Then this wfst can be serialized as binary java fst

1
2
3
4
5
		try {
			wfst.saveModel("path/to/filename");
		} catch (IOException e) {
			e.printStackTrace();
		}

or exported to openFst text format

1
		Convert.export(wfst, wfst.getSemiring(), "path/to/exported");

Finally it can also be used for several operations as described in the following section.

2. Fst Operations

As already mentioned, priority was given to operations that are required for the porting of phonetisaurus’ g2p decoder to java. All operations described are defined in their own class having the same name with the operation under the edu.cmu.sphinx.fst.operations package.

2.1. ArcSort

This operation sorts the arcs in an FST per state. It is defined as follows:

1
public static <T extends Comparable<T>> void apply(Fst<T> fst, Comparator<Arc<T>> cmp)

The Comparator cmp can be either ILabelCompare or OlabelCompare which short the arcs according to their input or output labels accordingly.

2.2. Compose

This operation computes the composition of two transducers [2]. It is defined as follows:

1
public static <T extends Comparable<T>> Fst<T> get(Fst<T> fst1, Fst<T> fst2, Semiring<T> semiring)

2.3. Connect

This operation removes all states that are not contained on a path leading from the initial state to a final state. It is defined as follows:

1
public static <T extends Comparable<T>> void apply(Fst<T> fst)

2.4. Determinize

This operation determinizes a weighted transducer. The result will be an equivalent FST that has the property that no state has two transitions with the same input label. For this algorithm, epsilon transitions are treated as regular symbols [3]. It is defined as follows:

1
public static <T extends Comparable<T>> Fst<T> get(Fst<T> fst)

2.5. ExtendFinal

This operations extends a wfst by adding a new final state with weight 0 and adding epsilon transitions from the existing final states to the new one, with weights equal to the existing state’s final weight. It is defined as follows:

1
public static <T extends Comparable<T>> void apply(Fst<T> fst)

Furthermore there is also a procedure to undo this change, which is defined as:

1
public static <T extends Comparable<T>> void undo(Fst<T> fst)

2.6. NShortestPaths

This operation produces an FST containing the n -shortest paths in the input FST [4], [5]. It is defined as follows:

1
public static <T extends Comparable<T>> Fst<T> get(Fst<T> fst, int n)

where n is the number of the best paths to return.

2.7. Project

This operation projects an FST onto its domain or range by either copying each arc’s input label to its output label or vice versa.  It is defined as follows:

1
public static <T extends Comparable<T>> void apply(Fst<T> fst, ProjectType pType)

where pType is an enumeration talking values either INPUT or OUTPUT which project the input labels to the output or the output to the input accordingly.

2.8. Reverse

This operation reverses an FST. Internally it first extends the input to a single final state and this extension is undone before exiting leaving the input fst unchanged. It is defined as follows:

1
public static <T extends Comparable<T>> Fst<T> get(Fst<T> fst)

2.9. RmEpsilon

This operation removes epsilon-transitions (when both the input and output label are an epsilon) from a transducer. The result will be an equivalent FST that has no such epsilon transitions [2]. It is defined as follows:

1
public static <T extends Comparable<T>> Fst<T> get(Fst<T> fst)

3. Performance in g2p decoding

The performance of the fst java library, was evaluated in g2p decoding by porting the phonetisaurus’ g2p decoder to java (available at [6]). N-gram fst models were created (for n=6,7,8,9 and 10) and then loaded in the decoder in order to phoneticize 5 different words. The loading time for each model and also the time of various operations taking place during the decoding, were measured and their average are summarized in the table below. The table also shows the memory used by the java VM after loading the model (this refers more or less to the memory needed by the model) and also the maximum amount of memory utilized during the g2p decoding. All tests were performed on an Intel Core Duo CPU running openSuSE 12.1 x64.

Performance tests of java g2p decoder

Table 1: Performance tests of java g2p decoder

The graphs below visualize the first four rows of the above table.

Performance graphs for the java g2p decoder

Figure 2: Performance graphs for the java g2p decoder

4. Conclusion – Future work

Studying the performance table in the previous section it is clear that the critical procedure in the decoding process is the model loading (deserialization) which usually take more than a minute to complete. Although this is an issue that needs to be fixed, a quick workaround is to load it in advance and keep a copy of it in memory for providing pronunciations for all required words. This of course comes with additional requirements for memory which are more or less equal to the amount shown in 3rd in the previous section’s table (row “Memory usage after load”).

Next step is of course to evaluate the g2p decoder’s ability to provide correct pronunciations for words and compare it with the original pronunciations produced by phonetisaurus. Having a same quality java g2p decoder will first of confirm the correctness of the java fst library code and enable us to continue with its integration with CMUSphinx 4.

References
[1] J. Salatas, “Phonetisaurus: A WFST-driven Phoneticizer – Framework Review”, ICT Research Blog, May 2012.
[2] M. Mohri, “Weighted automata algorithms”, Handbook of Weighted Automata. Springer, pp. 213-250, 2009.
[3] M. Mohri, “Finite-State Transducers in Language and Speech Processing”, Computational Linguistics, 23:2, 1997.
[4] M. Mohri, “Semiring Framework and Algorithms for Shortest-Distance Problems”, Journal of Automata, Languages and Combinatorics, 7(3), pp. 321-350, 2002.
[5] M. Mohri,  M. Riley, “An Efficient Algorithm for the n-best-strings problem”, Proceedings of the International Conference on Spoken Language Processing 2002 (ICSLP ’02).
[6] G2P java decoder SVN repository

Porting openFST to java: Part 3

Notice: Parts of this article may be outdated. There are many changes to its API and performance improvements recently in the java fst framework. Please refer to recent articles in Java FST Framework category for the latest info.

(originally posted at http://cmusphinx.sourceforge.net/2012/07/porting-openfst-to-java-part-3/)

Foreword

This article, the third in a series regarding, porting openFST to java, introduces the latest update to the java code, which resolve the previously raised issues regarding the java fst architecture in general and its compatibility with the original openFST format for saving models. [1]

1. Code Changes

1.1. Simplified java generics usage

As suggested in [1], the latest java fst code revision (11456), available in the cmusphinx SVN Repository [2],  assumes only the base Weight class and modifies the State, Arc and Fst classes definition to simply use a type parameter.

The above modifications provide an easier to use api. As an example the construction of a basic FST in the class edu.cmu.sphinx.fst.demos.basic.FstTest is simplified as follows

1
2
3
4
5
6
7
8
9
10
11
12
13
14
15
16
17
18
...
Fst<Double> fst = new Fst<Double>();
 
// State 0
State<Double> s = new State<Double>(); 
s.AddArc(new Arc<Double>(new Weight<Double>(0.5), 1, 1, 1));
s.AddArc(new Arc<Double>(new Weight<Double>(1.5), 2, 2, 1));
fst.AddState(s);
 
// State 1
s = new State<Double>();
s.AddArc(new Arc<Double>(new Weight<Double>(2.5), 3, 3, 2));
fst.AddState(s);
 
// State 2 (final)
s = new State<Double>(new Weight<Double>(3.5));
fst.AddState(s);
...

1.2. openFST models compatibilty

Besides the simplified java generics usage above, the most important change is the code to load an openFST model in text format and convert it to a java fst serialized model. This is achieved also in the latest java fst code revision (11456) [2].

2. Converting openFST models to java

2.1. Installation

The procedure below is tested on an Intel CPU running openSuSE 12.1 x64 with gcc 4.6.2, Oracle Java Platform (JDK) 7u5, and ant 1.8.2.

In order to convert an openFST model in text format to java fst model, the first step is to checkout from the cmusphinx SVN repository the latest java fst code revision:

# svn co https://cmusphinx.svn.sourceforge.net/svnroot/cmusphinx/branches/g2p/fst

Next step is to build the java fst code
# cd fst
# ant jar
Buildfile: <path-to>/fst/build.xml
jar:
build-subprojects:
init:
[mkdir] Created dir: <path-to>/fst/bin
build-project:
[echo] fst: <path-to>/fst/build.xml
[javac] <path-to>/fst/build.xml:38: warning: 'includeantruntime' was not set, defaulting to build.sysclasspath=last; set to false for repeatable builds
[javac] Compiling 10 source files to <path-to>/fst/bin
[javac] <path-to>/fst/build.xml:42: warning: 'includeantruntime' was not set, defaulting to build.sysclasspath=last; set to false for repeatable builds
build:
[jar] Building jar: <path-to>/fst/fst.jar
BUILD SUCCESSFUL
Total time: 2 seconds
#

2.2. Usage

Having completed the installation as described above, and trained an openfst model named binary.fst as described in [3], with the latest model training code revision (11455) [4] the model is also saved in the openFST text format in a file named binary.fst.txt. The conversion to a java fst model is performed using the openfst2java.sh which can be found in the root directory of the java fst code. The openfst2java.sh accepts two parameters being the openfs input text model and the java fst output model as follows:

# ./openfst2java.sh binary.fst.txt binary.fst.ser
Parsing input model...
Saving as binary java fst model...
Import completed.
Total States Imported: 1091667
Total Arcs Imported: 2652251
#

The newly generated binary.fst.ser model can then be loaded in java, as follows:

1
2
3
4
5
6
7
8
9
try {
	Fst<Double> fst = (Fst<Double>) Fst.loadModel("binary.fst.ser");
} catch (ClassNotFoundException e) {
	// TODO Auto-generated catch block
	e.printStackTrace();
} catch (IOException e) {
	// TODO Auto-generated catch block
	e.printStackTrace();
}

3. Performance: Memory Usage

Testing the conversion and loading of the cmudict.fst model generated in [3], reveal that the conversion task requires about 1.0GB and the loading of the converted model requires about 900MB of RAM.

4. Conclusion – Future Works

Having the ability to convert and load an openFST model in java, takes the “Letter to Phoneme Conversion in CMU Sphinx-4” project to the next step, which is the port of phonetisaurus decoder to java which will eventually lead to its integration with cmusphinx 4.

A major concern at this point is the high memory utilization while loading large models. Although it is expected for java applications to consume more memory compared to a similar C++ application, this could be a problem especially when running in low end machines and needs further investigation and optimization (if possible).

References

[1] J. Salatas, “Porting openFST to java: Part 2”, ICT Research Blog, May 2012.

[2] Java fst SVN (Revision 11456)

[3] J. Salatas, “Automating the creation of joint multigram language models as WFST: Part 2”ICT Research Blog, June 2012.

[4] openFST model training SVN (Revision 11455)